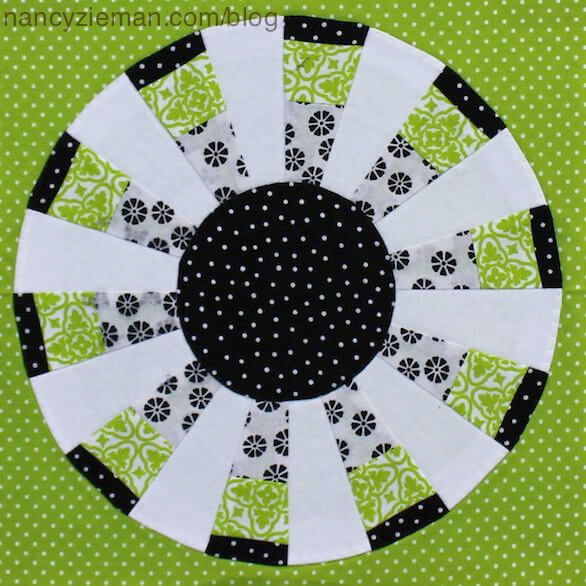
2015 Adventure Quilt—Block of the Month #4

We are one-third of the way through the 2015 Adventure Quilt—my first Block of the Month journey. I’m planning my finished quilt to include 24 total blocks, making two scrap blocks each month from the same pattern with different fabrics.
Our fourth Block of the Month pattern is the The Ferris Wheel Block. The Trace ‘n Create Quilt Template— Dresden collection is the quilting tool that helps you create this scrap-friendly block.
Remember, this quilt will be a scrap adventure for you and me. Total yardage for the entire quilt is not provided; rather we are working in a color palette of scraps (or Fat Quarters).
If you’d like this block pattern as a downloadable PDF, please click the “Print Post as PDF” button at the lower right of this post.
Notions, Fabrics and Supplies:
- Assorted fabric scraps or fat quarters
- Solid white fabric
- Clover’s Trace ‘n Create Quilt Template—Dresden Collection
- SofShape Fusible Interfacing
- 45 mm Pinking Rotary Cutter Blade by Clover
- Fine Tip Water Soluble Marking Pen
- Optional: Clover’s Point 2 Point Turner
Getting Started:
Throughout this adventure, I am working in a scrappy palette of three colors. As I rummaged through my quilting fabric scraps, I found that I had the most of these colors on hand.
 Keep in mind that you may need to add interchangeable pieces as the months progress. I found out last month that some of my go-to fabrics were now gone. As this quilt adventure progresses, you too may need to buy additional fabrics during the process. How’s that for an excuse to buy fabric?
The Ferris Wheel Block
The block this month measures 12-1/2″ x 12-1/2″, and it measures 12″x 12″ once it is stitched into a final project. A 1/4″ seam allowance is included.
Create the Wedges:
- Choose fabric strips and cut to these widths:
- White print—2-1/2″ wide x 22″ long
- Green print—1-3/4″ wide x 22″ long
- Black print—1″ wide x 22″ long
- Stitch strips together to form a row, as we did in January’s Block of the Month to create a strip set 4-1/4″ wide x 22″ long.
- Press seam allowances in one direction.
- Align wedge template on strip set. Trace along each side of template. Rotate template, align along previously marked line. Trace along opposite side of template.
- Rotary cut on the marked lines.

- Cut solid white fabric strips 4-1/4″ wide x 22″ long
- Use the Dresden collection Wedge Template and fine-tip pen to trace wedge shapes on the strip set and white fabric.
- Rotary cut on the marked lines.
Create the Ferris Wheel:
- Separate the wedges into the two color/strip orientations. In the featured blocks, one group of wedges will have a polka dot strip along the top or wide end; the second group of wedges will have the polka dot strip along the lower/narrow end.
- Ten strip set wedges are needed for each Ferris Wheel block.
- Pair a colorful wedge with a white wedge; stitch ten pairs for each ferris wheel.
- Press the seam allowances toward the darker fabric.
- Stitch the pairs together to create a complete circle.
- Lay the block right side down on the smooth side of the interfacing. Pin.
- Use a 1/4″ seam allowance to stitch around the Ferris Wheel.
- Trim 1/4″ past the stitching line using a pinking rotary blade.
- Carefully trim away the center of the interfacing, leaving about 1″.
- Use a point turner to smooth the curved edge as the interfacing is turned to the wrong side.
Audition the Background and Center Circle Fabrics:
- Audition background fabrics for the quilt block.
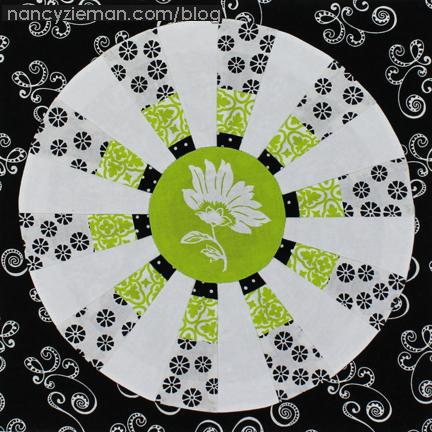
- See the alternate wedges used in both fabric audition photos below.
Create the Center Circle:
- For the center block circles, layer and pin a 4-1/2″ square of interfacing onto a 4-1/2″ square of fabric, matching smooth side of the interfacing and right side of the fabric.
- Use the Circle Template from the Dresden Collection to trace the smallest circle on the fusible, bumpy side, of the Sof Shape interfacing.
- Stitch directly on the marked line using a slightly smaller stitch length.
- Trim 1/4″ past the stitching line using a pinking rotary blade.
- Use a point turner to smooth the curved edge as the interfacing is turned to the wrong side.

Center the Circles on the Background Fabric
- Center the Ferris Wheel Quilt Block on the 12-1/2″ x 12-1/2″ background. Pin.
- Also center and pin the center circle to the block.
- Edgestitch or zigzag stitch both circles—the Ferris Wheel design and the center circle block to the background fabric with monofilament thread.
Share your 2015 Adventure Quilt Blocks Socially
If you have a blog site, website, or online social sewing group, feel free to grab the code and share this button.

<div align="center"><a href="http://www.nancyzieman.com/blog/category/2015-block-of-the-month/" title="Nancy Zieman Blog - 2015 Adventure Quilt" target="_blank"><img src="https://nancyzieman.com/blog/wp-content/uploads/2015/01/Nancy_Zieman_Block_of_the_Month.jpeg" alt="Nancy Zieman Blog - 2015 Adventure Quilt" style="border:none;" /></a></div>
If you are on social sites like Instagram, Twitter, Flickr or Facebook, let all your friends know you are working on The 2015 Adventure Quilt Blocks by tagging your post with the hashtag: #NZBoM.
The hashtag is a searchable “word” associated with an event or activity, which, when searched on popular social websites, like Instagram, Twitter, Flickr, and Facebook, shows every single post using that hashtag. Even if you don’t personally know that quilter, you’ll see her/his progress and a photo. Hashtags are a fun way to network and connect with people who share similar interests.
What would a quilt look like?
As part of this Block of the Month series, I’ve included ideas of what a quilt might look like if you made it with only this month’s block. Some of the concepts have sashing and others do not. I hope you like this brainstorming session!
- This table runner is constructed using five total blocks in the two featured color variations. The first white border gives a peaceful break in the overall bold green and black design.
- The following quilt uses 49 Ferris Wheel blocks set in an altered “Trip Around The World” quilt layout and framed with a large border. This quilt will be called Trip Around the Ferris Wheel.
- With white tone-on-tone cotton sashing, this traditional quilt setting is bright and fresh. The cornerstones are created using the circle template, using the instructions (above) for the Ferris Wheel appliquéd circle centers.
For more Dresden quilt ideas, watch Sew Grand Dresden Quilts on Sewing With Nancy: 
To watch Sewing With Nancy on your iPad, iPod Touch, or iPhone, download the app.
Link to all the 2015 Adventure Quilt Block of the Month Series
(In the 2015 Adventure Quilt Block of the Month series, we’ll be making twelve fun blocks from five different templates/tools: Carefree Curves Template, Dresden Template, Grandmother’s One-Patch Template, Lone Star Template, and the No-Hassle Triangles Gauge.)
See the previous three 2015 Adventure Quilt Blocks HERE.
Bye for now,







Berenice
I could see this in browns, yellows and oranges. I think it looks like a happy sunflower!
ArleenDale Kirtland
I think there is a small mistake in the illustration for cutting the multi-fabric wedges. You can’t flip the template and get the same look as the sample block. You have to maintain the black at the top of the wedge.
Nancy Zieman
Hello Arleen,
We tried to clarify our instructions per your recommendation. Refresh your blog page and reread the updated instructions. The changed copy is in ” ” for your reference.
* Separate the wedges into the two color/strip orientations. “In the featured blocks, one group of wedges will have a polka dot strip along the top or wide end; the second group of wedges will have the polka dot strip along the lower/narrow end.”
* Ten strip set wedges are needed for each Ferris Wheel block.
* Pair a colorful wedge with a white wedge; stitch ten pairs for each ferris wheel.
Hope this helps.
BevM
I am enjoying these blocks, and look forward to them each month.
Alma
Is it my eyes???!!! The ‘Trip Around the Ferris Wheel’ quilts are alive!! They are stunning. Is it the colours? Is it the fabric? Again, I’m saying ‘I’ll have to make a quilt like that.’ I said that last month and the month before and I just Had to make January’s quilt. I was in AZ, USA, then and bought all the supplies from Nancy’s Shop. Now I’m back in South Australia I’m so glad that I did buy them, even the fancy cutting blades. Well, I’m back and I haven’t begun January’s blocks yet…. top procrastinator here …. but I have begun stitching again and I just love these quilts. They have Life and that’s what I need. Thank you, so much, Nancy, for the thought and work you are putting so generously into this project, twelve times over. If I am to catch up, I have some work ahead of me but I know that once I do begin there’ll be no stopping me. Thank you, too, for this inspiring collection of beautifully set up blocks.
Nancy Zieman
Thanks for the nice note, Alma. You made me smile!
Belinda
The measurement for the white strip in the pdf download is 4-1/2 inches by 22 inches, Is the correct measurement 6-1/2 inches by 22 inches?? 4th quilt block for 2015.
Nancy Zieman
Selinda,
We have “egg on our face!” Thank you for drawing this to our attention. The strips measurements are correct, the finish strip set width is incorrect. It stated 6-1/4″ and should have been 4-1/4″. If you refresh you page, the correct numbers will appear.
Again, thank you!
Jennifer Fried
Dearest Nancy, Thank you. I have been admiring this ferris wheel design for quite a while. I love how it conveys motion. Thanks again for sharing. The old sew and sew, Jennifer
Karen
Nancy thanks for all the great guilt blocks. I am looking forward to your sewing weekend. I am disappointed that this the second time of hoping to meet you in person at an event. My son said you will ask me to sign up for any more. Hope you are doing well.