
Sew and Donate a Travel Pillowcase
When my team recently approached our local cancer treatment center to inquire about their sewn item needs, the response was immediate: “Super-soft travel pillows with washable pillowcases”. We were happy to oblige. I encourage you to reach out to your local hospitals and treatment centers to ask if they may have similar needs. Here’s a free tutorial on sewing travel pillowcases.
Sewing Tutorial
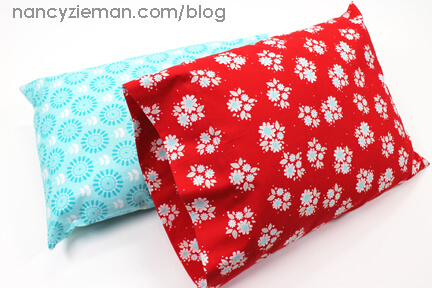
Here’s a quick sewing tutorial for a super-easy travel-sized pillowcase, which is designed to fit over smaller pillow forms (14″ x 20″); available at most big box retailers. Or, you can sew your own 14″ x 20″ pillow forms (below).
Supplies
- 2/3 yard washable cotton fabric
 Cutting

- Cut a fabric rectangle 24″ x 30″.

Create the Travel Pillowcase
- Along one 30″ edge, press under 1/4″ towards the fabric’s wrong side.

- Along the same edge, press under 3″ hem.

- Edgestitch.

- Fold the fabric in half, matching right sides and matching the 24″ cut edges. Pin.

- Serge the seam.
Note from Nancy: A straight stitch with a 1/4″ seam allowance and zigzag stitch to secure the seam can be used in place of the serger.
- Fold or “wrap” the seam allowance forward and serge the remaining seam at the end of the pillowcase.

- Use a hand embroidery needle to secure the serger thread ends into the stitched seam.

- Press the pillowcase flat.

- Turn right side out and insert travel pillow.

How to sew a travel pillow insert:
- Cut a fabric rectangle 20-1/4″ x 28-1/2.
- Fold the fabric in half, matching right sides and matching the 20-1/4″ cut edges. Pin.

- Serge one short edge.

- Fold or “wrap” the seam allowance forward and serge the long edge of the pillow.

- Stuff the pillow with super-soft fiber fill and serge the opening closed.
 Ta-da! These are so fun, fast and easy to make! Plus these pillows are such a comfort to those undergoing medical treatments.

For more ideas for charitable outreach sewing in your local community, nationwide or internationally, visit the Sew To Give page here on my blog.
Bye for now,
![]()


Frances Adams
Directions are so precise. Wish they had this type of instructional media 65 years ago. Would have helped me. Thanks, Nancy, your work is great!
Ella Buck
Nancy I love every post you do. What happened to your show that aired here in Hanford California on my local channel 8? I miss you!
Sheila Sullivan
Thanks for this idea.
Beverly
Love your turned serger corners…why have I forgotten that extra touch. It is a super tip!
Sammi
THANKS for this tute!!!
Kity
I have never seen the turned serger corners before. Great new tip!
Brenda Ackerman
Thank you for sharing this pattern and tutorial! Two quilting friends and myself have been talking about creating a project that would be quick/easy and something that does not require a lot of fabric and time. Only because with just the three of us doing this we know we are not going to contribute a large quantity. Yet we also know we are wanting to give to our community…I think this project will fit the requirements perfectly. Now, we will check some of our local resources and see if these are something that they would need. Thank You once again for all of your brilliant ideas, tutorials, tips and patterns. I continually learn from you. Have a wonderful creative day!
Nancy
I’ve never done corners that way. If Nancy recommends it, surely there’s a good reason. Can someone please fill me in? Thanks!
Nancy Zieman
Nancy, the technique is called “wrapped corners” and it produces sharp corners without bulk. I’ve been sewing corners this way for most of my career and have never been disappointed! Give it a try.
Nancy
Thanks, Nancy Z for your quick response! I most certainly will give it a try next time!
Becky Payne
These are super easy to make with a French seam if you don’t have a serger. That is how I do it.
Sharon Cripe
A very basic question. Do I pre-shrink the fabric? If no, won’t they ‘twist’ upon washing?
Nancy Zieman
Sharon, you can always pre-wash fabrics. Fabrics will only “twist” if they are cut off grain.
Sharon Cripe
Thank you for your response! I’m 74 and was always taught to pre-shrink fabric before cutting/sewing. However, I’ve discovered that the new generation doesn’t pre-shrink anything.
1921681254
The tutorial would have been presented better if after Step 8 there were two separate paths to follow to choose from, one for someone using a serger and one for someone using a sewing machine instead of having duplicate sequential instructions.