A Designer Handbag Exclusive—Cinched Tote
After designing and completing a new pattern or product, I often think of variations of the theme! That’s what happened after Eileen Roche and I designed Handbags 2—Designer Knockoffs. Rather than keeping the idea in my head, I decided to share it with you!

The Bag

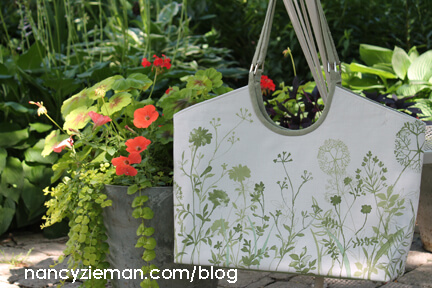
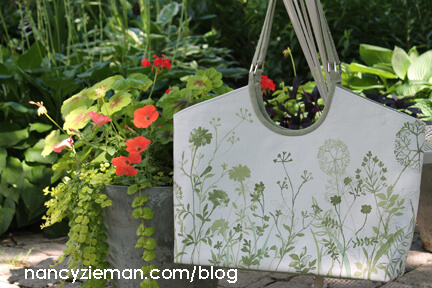
Create a cinched tote bag with the help of eight unique embroideries that give placement for designer grommets. A continuous strap weaves in and out of the grommets providing flexibility around the tote top. Handbags 2—Designer Knockoffs embroideries give both placement and embellishment. Instead of stitching four embroideries that provide placement plus design, add a total of eight embroideries for grommets.
Supplies
- Handbags 2–Designer Knockoffs
- Double-sided quilted fabric
- Eight 1″ Grommets
- Trace ‘n Create Florida Bag Template
- Tear-away stabilizer
- 1 pkg. 1″ Create a Strap
- 2 yds. 5/8″ grosgrain ribbon
- Painter’s tape
Add embroideries:
- Trace, then cut out the pieces for the tote bag from the double-sided quilted fabric, using the Florida Tote template. (For additional information on making a tote bag using quilted fabric, reference Hobo Totes—Casual to Classic.)
- Transfer the StarburstGromSmJumbo grommet design from the CD found in Handbags 2—Designer Knockoffs.
- Hoop tear-away stabilizer in an 8″ x 12″ hoop or any extra large hoop.
- Stitch the first thread color, the placement line, directly onto the stabilizer.
- Mark the center along the top of the front and back center panels with a pin.

- Align the fabric and center pin mark with the markings stitched on the stabilizer.
- Use painter’s tape to position fabric to the stabilizer.

- Embroider the design. The same thread color was used for all the embroidery elements.
- Tear the fabric away from the stabilizer.
- After embroidering the front piece, repeat by adding the same embroidery to the back.

Add side grommet embroideries:
- Select and transfer the StarburstGromSm embroidery design to the sewing machine.
- Hoop tear-away stabilizer in a 5″ x 7″ hoop. Stitch the placement line and the circular grommet lines on the stabilizer.

Important note: The vertical center stitching is not applicable for this unique application. This embroidery was designed as a grommet placement for straps when using a 5″ x 7″ hoop. This time, the embroidery is added to each side of the handbag as part of the cinching design.
- To center the grommet on the side panel of the tote bag, place the fabric under the stabilizer. Center the circle. Place a mark on the stabilizer at the left edge of the fabric.

- Remove the fabric from underneath the stabilizer and place it on top of the stabilizer. Align the fabric along the marking to the left and the top placement line. Secure fabric to the stabilizer.
- Before embroidering the design, back up one thread color so that the circle embroideries are restitched on the fabric.
- Embroider the design. Carefully remove the fabric from the stabilizer.
- Repeat the embroidery technique on the remaining side panels.

- Following the instructions in Handbags 2—Designer Knockoffs, trim out the center of the fabric, cutting between the two embroidered circles. Apply the grommets following the instructions included in the grommet packaging.
- Stitch the side seams.

Hanging Snaps
I generally add magnetic snaps to the lining of the bag. But, when working with double-sided quilted fabric, there isn’t any lining fabric, and the snaps would show from the right side of the bag. What’s the solution? Create hanging snaps. More tips on working with double-sided quilted fabric are included in the Trace ‘n Create Hobo Tote Template.

Side Note: Before taking this photo, we did not remove the stabilizer. Hmm, that white stabilizer doesn’t look too great. After removing the excess stabilizer, the finished handbag looks better!
- Cut two 1″ x 2″ rectangles of Shape ‘n Create.
- Cut two fabric rectangles 1-1/2″ x 4″. Fold rectangles in half, meeting short edges and wrong sides. (Photography is from a previously created bag.)

- Stitch sides with 1/4″ seams. Turn right side out.
- Insert Shape ‘n Create rectangles into fabric pockets.

- Attach snaps.

- Center hanging snaps on inside of tote, meeting raw edges, with snaps meeting each other. Baste to upper edge.

Finish the Bag
- Finish the top edge of the handbag with binding.
- Add a bag-bottom insert of Create ‘n Shape (plastic bag bottom) to the bottom of the tote. Cut the plastic the size of the tote base and insert in a fabric pocket.
- Position the bag-bottom insert in the base of the bag.
Create a Continuous Strap
- Cut two 2″ x 45″ lengths of fabric. If using quilted fabric, separate the layers after cutting the strips. The narrow fabric will quickly separate after clipping a few threads.
- Seam the short ends; trim to a 70″ length.
- Cut a 70″ length of ribbon. Or, cut two 1-1/2″ crosswise strips of contrasting fabric. Sew short ends; trim to 70″. Thread strip through a 3/4″ Bias Tape Maker; press.
- Press Create-a-Strap to the wrong side of the 2″ wide strip.
- Fold strip along perforations; press.
- Place ribbon or trim over raw edges of the strip.
- Topstitch along both sides of ribbon or trim, leaving the first and last 3″ unstitched.

- Weave strap through grommets as pictured.
- Connect straps by meeting short ends, right sides together. Stitch with 1/4″ seam allowances; press. Repeat for ribbon.
- Finish topstitching the ribbon to the strap. Ta da!

Three Handbag Styles and Embroideries in One Convenient Book
 Eileen and I included the instructions and embroideries for the featured bags in Handbags 2-Designer Knockoff. Click here to order and preview what’s inside the book.
Watch Sewing With Nancy online.
Watch Handbags 2–Designer Knockoffs, Part One with my guest Eileen Roche.
Watch Handbags 2–Designer Knockoffs, Part Two with my guest Eileen Roche:
There are four seasons of programs to watch online, or on your iPad, iPod Touch, or iPhone. Have you downloaded the app?
Bye for now,


Mary Anne Chambers
That is brilliant……I really love it! Oh to have an 8 day week!!!
Kim M. Harrington
I love this idea, because the bag can get as big as you may need it to, yet it compacts down smaller when you don’t!
allen king
I love, love, love this bag!
Pat O.
I can’t wait to try this using stash fabric and colorful grommets! Thanks, Nancy.
Carol Grimes
Thank you for sharing – this is my favorite style and you make it look so simple. You are the greatest – I wish you were my next day neighbor!
Coni
My compliments to you on these beautiful bags and your ideas to make them so special, but I cannot get so enthused about them as I do not own an expensive embroidery machine. I love the embroidery around the grommets. Someday when I am old maybe I will have the money to own a beautiful embroidery sewing machine. I wish they were more modest in price for the average sewer to take advantage of all the great embroidery experiences. I love what you create and do not stop showing what is available to us sewists at all levels.
Helen
More great ideas for bags. I love it! Your directions are always clear and concise.
Kathy Piotrowski
I love the bags also!!! Have you considered offering it as a kit? I do not have the embroidery machine. Is there another way to make it? Thanks.
Samina
Wow, that’s really a gorgeous bag! I really like that design & am going to have to check out the book & DVD.
Starla
I have a piece of double-sided, quilted RED fabric. Now I know what I want to use it for!
Robyn
Adorable bag! Again, you amaze me by making it seem so easy! Love the handles!! Clever!!
Aimee Aimee
Custom Embroidery Digitizing
Thank you for a great explanation. I was looking online for a similar idea and really appreciate it