
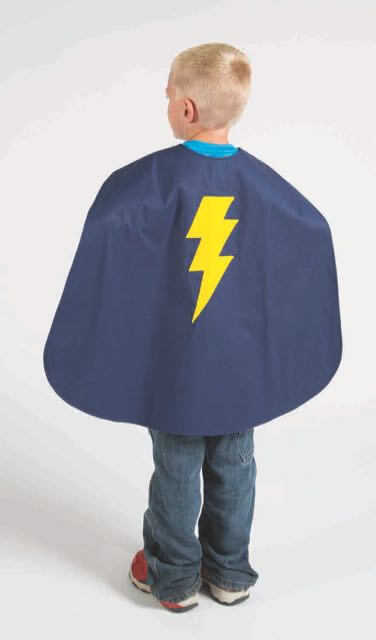
I Sew For Fun Project Tutorial: Superhero Cape


Tune in and watch Nancy and her granddaughters, along with friends, take a modern approach to sewing. Nancy shares her team sewing-for-fun experience along with many tips for a big partner, and numerous insights for involving a little sewing partner—all while making simple, easy to sew kid-friendly projects. Watch I Sew For Fun on Sewing With Nancy!

Superhero Cape Sewing Tutorial
Approximate Finished Size: 34″ x 35″
Supplies Needed:
- 1 yd. Fabric A (solid-colored or novelty fabric—outside cape)
- 1 yd. Fabric B (coordinating fabric—lining)
- Ultimate Felt Pack for appliqués—Choose colors to correspond to design.
- Pellon’s Lite EZ Steam II fusible web
- 2″ hook and loop tape
- Pattern Tracing Paper
- Optional Notions: buttons, rhinestones, glitter, and I Sew For Fun Heart Shaped Straight Pins, I Sew For Fun 5-in-1 Sliding Gauge, and I Sew For fun Fabric Marking Pen.
Instructions:
Please read all instructions before beginning. Use the width of the presser foot as the depth of the seam allowances.
1. Create a pattern for the cape on pattern tracing paper:
- Draw an 18″ x 35″ rectangle on pattern tracing paper. Mark one 35″ edge as a foldline.
- Measure and fold 9″ from the top of the pattern paper. Unfold, and mark along the fold.

- Create your own neckline pattern by tracing one half of a 6-inch saucer plate.
- Draw a diagonal line from the side edge of the neckline pattern to the lower right corner of the pattern paper.
- Place a dinner plate at lower cape corner and mark a curved hem.
 Show your little partner how to round corners with the dinner plate. It’s a fun experience for them to round off the corners!
- Cut out the paper pattern.
2. Use paper pattern created above to cut out cape and lining.
- Place pattern on fold of Fabric A; pin. Cut out front of cape; remove pins.
- Place pattern on fold of Fabric B; pin. Cut out lining of cape; remove pins.

3. Select and prepare appliqué:
Skip to step 5 if you are not adding an appliqué.
- You are the designer, choose your own design to place on the back of the cape.
Have your little partner choose an appliqué pattern, the color of appliqué felt, and any buttons, rhinestones, or glitter that they would like to add. Time for a little BLING!
- Trace appliqué design onto paper side of Pellon’s Lite EZ Steam II, following manufacturer’s instructions.

Appliqué patterns have been mirror imaged.
- Roughly cut out appliqué, allowing approximate 1/8″ margins around all edges.
- Position appliqué on wrong side of felt appliqué fabric. Press, following manufacturer’s instructions.
- Cut out appliqué, following traced lines.

4. Position appliqué on back of cape and press into place:
- Fold Fabric A cape lengthwise and mark center fold with a pin.
- Use an I Sew For Fun 5-in-1 Sliding Gauge to measure 3″–4″ from neck edge of cape. Mark with an erasable I Sew For fun Fabric Marking Pen or pencil.


- Remove paper backing and center appliqué on back of cape with top edge at marking.
Show your little partner how to take a pin and make a scratch mark on the paper backing. Use edge of scratch mark to remove paper from the appliqué. Position appliqué at mark on cape.

- Cover appliqué with a press cloth and press to fuse, following manufacturer’s instructions.
5. Complete cape:
- Press cape and lining.
- Optional: Add some buttons or other bling to the appliqué.
- Pin cape and lining, right sides together, aligning cut edges.

- Stitch outer edges of cape, leaving a 4″–5″ seam opening on the lower hemline edge for turning.

- Trim seam allowances around the neckline and body of the cape, using a pinking shears or rotary cutter with a pinking blade.
Don’t trim 4″–5″ seam opening at lower hemline edge.

- Turn cape right side out, through opening at lower hem edge. Use a point turning tool to push out seams at neckline extensions. Press.
- Press seam allowance to inside at opening in hemline.
- Complete cape by topstitching around outer cape and neckline edges.

6. Prepare and stitch hook and loop tape closure:
- Lay cape right side up and pin the hook side of hook and loop tape (1–1/2″ strip) to right neckline extension, as shown. Stitch through both layers using a straight or zigzag stitch.
- Pin the loop (soft) side of hook and loop tape (2″ strip) to left neckline extension on the lining side of the cape. Stitch through both layers using a straight or zigzag stitch. The longer tape on the left neck extension allows you to adjust finished neckline.

It’s time for your little partner to put on the cape and show off his/her super powers! Voila!
Tune in and watch Nancy and her granddaughters, along with friends, take a modern approach to sewing. Nancy shares her team sewing-for-fun experience along with many tips for a big partner, and numerous insights for involving a little sewing partner—all while making simple, easy to sew kid-friendly projects. Watch I Sew For Fun on Sewing With Nancy!
![]() Watch I Sew For Fun on Sewing With Nancy online at NancyZieman.com.
Watch I Sew For Fun on Sewing With Nancy online at NancyZieman.com.

Visit ShopNZP.com for our selection of I Sew For Fun Products by Nancy Zieman.

Happy Sewing,
Team Nancy Zieman
Nancy Zieman Productions, LLC.
![]()


Eva Osmun
I love that this gauge has a circle compass. I’m always looking for something that has multifunctions. I love this!
Joyce Migliore
A drawstring backpack would be a fun project to make together!
Clovis
You can never have too many measurement products. Would make items for niece and nephew.
Vivian Oaks
I have been making and saving half-square triangles from leftover pieces of other blocks and this would be the perfect tool to make them accurate! Thanks so much for the chance to win!
Bridget
I’ll be making a bed runner with my little sewer.
Rosie
My grandson wants to be a super hero when he grows up. This cape would be perfect for him.
Shirley Clark
You can never have too many super hero capes! I’m hoping the next great grandbaby will be a boy! Due in December! My little great granddaughter loves for me to sew for her too!
Dixie
I would love to work on a backpack with my granddaughter who wants to learn to sew.
Bonnye
I make all the neighborhood children play capes. These are adorable.
Carolyn T
I hope to make a drawstring bag with a friend who is just learning to sew. It will be great for our pickle ball gear!
Teri
Will definitely be making this cape with grandchildren along with a few softies.
Susan L.
My granddaughters want to make some clothes for their American Girls dolls. So, that will be our next sewing project.
Barb K
My youngest Granddaughter started a simple squares quilt–maybe we will be able to continue this summer.
Diane Putzer
My potential sewing partner isn’t quite 2, so it will be a little while before we can make the cape together.
Hannah W
I was inspired by an earlier I sew for fun post and I’m following through on making pot holders with my daughter