
Perfectly Miter Quilt Borders Without the Math!
Kate Bashynski, a member of the Sewing With Nancy team, designed the No-Math Miter Template Set to miter corners quickly and easily. Use the No-Math Miter Template Set to add mitered borders plus finish the quilt edge without a quilt binding, in one process. You can choose from six finished border sizes: 3/4″, 1″, 1-1/2″, 2″, 2-1/2″, and 3″.

How to Use No-Math Miter Templates as a Quilt Finish
- Determine the finished size of the quilt border. There are six options: 3/4″, 1″, 1-1/2″, 2″, 2-1/2″, and 3″.
- Layer the quilt top, batting, and backing. Pin layers together.
- Cut the batting the finished width of the border minus 1/4″ on all four sizes.
- Cut the backing fabric double the finished width of the border plus 1/4″ on all four sides.

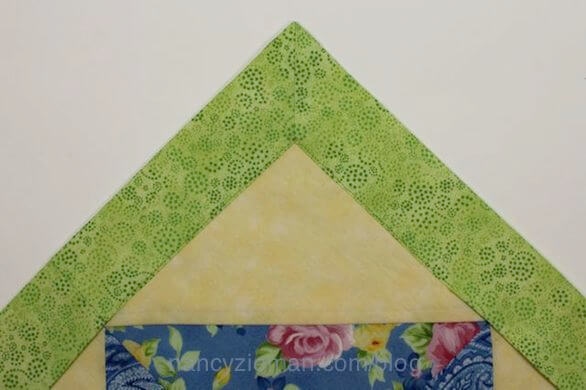
In the example, the finished border measures 2″. The batting was cut 1-3/4″ wider than the quilt top on all four sides, and the backing was cut 4-1/4″ wider than the quilt top on all for sides.
- Quilt the layers together as desired.
- To make a 2″ border for a quilt, I selected the 2″ No-Math Miter Template.
- Align the template with the corner of the backing fabric and trace each mitered corner using the 2″ No-Math Miter Template.

- Cut on the traced lines.

- Press up the 1/2″ seam allowance along the outer edges of the quilt.

- Open the seam allowance and fold each corner in half diagonally, right sides together, and stitch with a 1/2″ seam.

- Clip up to, but not through, the stitching at the corner.

- Press the seam open. Use the Iron Finger, a silicone pressing tool, to easily press the mitered corner area.

- Turn the backing/border fabric to the right side, turn under the 1/2″ seam allowance, and press.
- Repeat these steps at each corner.
- Edgestitch the border to the quilt.
- Ta da!

The No-Math Miter Template Set
Isn’t this a handy way to finish a quilt project? If you’d like to have a No-Math Miter Template Set of your own, Shop Nancy’s Notions.

What Do You Think of No-Math Miter Templates?
Bye for now,
![]()


marianne
Thanks for sharing!! Great idea for making those perfect borders. thanks for the tutorial!!! I love when there are diagrams, it gives me a better picture of how things should be done.
Chris H
I like this. At end where you say edge stitch, it is edge stitching the inner edge of the border? Think I will try this on a small test sample.
Thanks for the info.
Chris in GA
Amelia McNairy
The No-Math Miter Template Set is definitely something I need in sewing room.
Barbara Howe
Wow, I didn’t know it could be so easy.
Sheila
What a cool idea! It sure beats the trial and error that I have used in the past (without much success). Great idea. Congrats to Kate. Good job.
Patricia in Iowa
I had to think through the process by following the pictures carefully. It seems fool-proof, once I understood the steps.
Linda
Thank you, you make it look so simple,I’ll have to try this.
kma
Adding to my Wish list… Buying gifts for my parents and inlaws was always so stressful; I like to have something to mention when my kids ask if I have any gift ideas for myself. I have always wondered why this method is not shown very often, and thought it had to do with the Quilt Police. And the lack of a good tool.
Karen
This looks like these make a quilt look professionally finished. Does Nancy have a video demonstrating this?
(another) Marianne
I’ve used this technique many times for flannel/cotton receiving blankets without batting. The ‘trick’ is cutting off the ‘right triangle’ at the correct place: a seam allowance width beyond desired finished blanket size. That being said, these nifty (little) templates will achieve!
Manufacturing suggestion: put a hole in each and ‘string’ them together so the (one I need) won’t get ~lost~
Process suggestion: Cut fabrics/batting an extra inch or so larger than needed for desired ‘binding’ width. Do all quilting or tying before squaring and exact cutting batting & backing.
DonnaRae
Got to have it! Mitering can be such a chore to get it right. This appears to be (as another reader wrote) foolproof!
Jo D
Say what? Doesn’t ‘seam’ possibke. Had to read it twice — No, 3 times. I would love to win this Template Set. It is amazing the techniques that are made easy.
Pat O.
Love this new tool for mitering corners. My friend, LP, might even need one too.
Starla
My gosh! This will make cornering a lot easier for me!
Lydia
Now why didn’t I think of this !! LOL Thanks this is awesome
Jan
I love these tools. Thank you!!! You make everything simpler and nicer!!!
Rosemary
Wow! Any little tool to make quilting easier is fantastic. Hmmm, my birthday is coming up. Sounds like something I can put on my “wish list.” Thanks for the idea!
Terri Burton
Appears to be a good tool, but I would trim the borders and batting after quilting due to the distortion heavy quilting could cause.
Lori M.
Oh, now this is going on my Christmas list…..Thank you for another time saving, and quilting easier tool……..
Kathleen Falk
Doesn’t look like NO MATH involved to me, add l/2 inch to this 1 1/2″ to that, subtract whatever here and there. I don’t think so.
Marie
…definitely on my to-get list…. I’d prefer to finish a quilt this way than adding binding all around…
CarolKE
Our church sewing group finishes most of our quilts this way. The templates would make a big difference.
CJ
This would certainly make life easier. 🙂
Allen
Wow, I would love to use these after the quilting process!
Janice King
Very efficient idea. And I really like having the backing used for the borders.
Natalie
If you’re only adding 1/4″ to the border measurements, how does that give you a 1/2″ seam allowance?
Nancy Zieman
Natalie, there is a 1/2″ seam allowance allowed even though it doesn’t seem like it! The quilt top has a seam allowance. Cutting the backing fabric double the width of the border plus 1/4″ will provide the needed fabric.
Kim M. Harrington
Best idea yet for this technique! Takes out all the fear and anxiety of miters. Looks very professional too!
Marty
New to making a larger project so never tried a mitered corner previously; this looks likes a great way to begin! 🙂
Joyce
Love to make it EASY to do miters !!!!
Joyce
Love to make it EASY to do miters!!
Jody
This looks like something I would like to try!
Eileen
Looks great—wish it wasn’t so expensive!
Diana Grindel
Looks like something to add to the “tool collection”
Anne Z.
Amazing!!!! Looks like an easy way to make perfect miters everytime and that will make sewing more fun.
Rita Sheloff
I’m confused! In the photo where you outlined the template, it looks like the line touches the corner of the batting. In the next photo under it, it clearly shows there’s a space between where the batting is and the fabric was cut away – presumably on the line that was just drawn. Please explain…
Carol Jansen
Dear Nancy
I love these templates. They would make miters so much easier. Thanks Nancy
Oscar Jackson
need to get the video of the strip borders have 5 tops but would like to have the video to watch again.. thanks