
Fat Quarter Mystery Quilt: July Block of the Month
Introducing the July Block of the Month
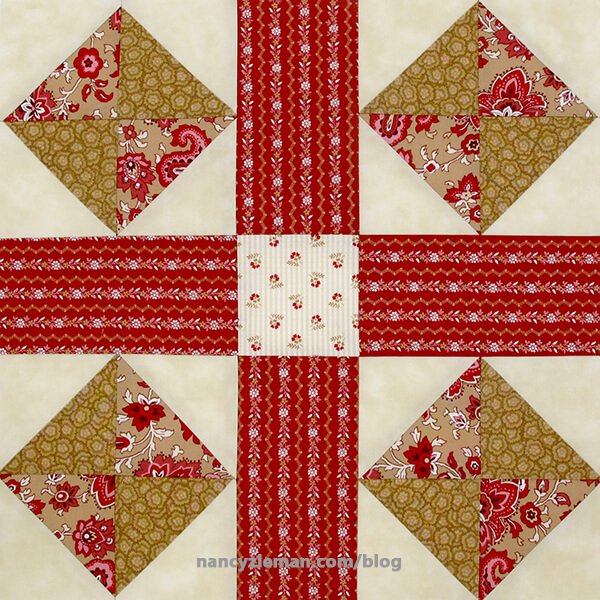
Red Cross* block is the July Fat Quarter Mystery Quilt Block. Like all blocks in this year’s block of the month challenge, this block is 15″ (finished size) and is created using quick strip-piecing techniques. Simple!
During this 12-month block of the month challenge, all blocks will be made from one 24-piece fat quarter bundle and 2-1/4 yards of cream background fabric. We’re using the fat quarter bundle, Garnet, it’s my most recent fabric line from Penny Rose, a division of Riley Blake Designs. You’re definitely welcome to use another collection of fabric, or fabrics from your stash!

Choose the Fabrics
For the Red Cross block, select the following fabrics from your Garnet fat-quarter bundle. If you’ve chosen another fabric collection, select two medium tones, one dark tone, one light tone, and the background fabric, for a total of five fabrics.

Cut
- Four 3-1/2″ x 6-1/2″ dark rectangles
- One 3-1/2″ x 3-1/2″ light square

- Eight 3-7/8″ x 3-7/8″ background squares
- Four 3-7/8″ x 3-7/8″ medium squares (paisley)
- Four 3-7/8″ x 3-7/8″ medium squares (tan)

Half Square Triangles (HSTs)
- Align block sets, right sides together. A print is paired with a solid block.
- Mark each block set diagonally from corner to corner, using a fabric marking pen and ruler.
- For greatest accuracy, use a No-Hassle Triangle Gauge. The left side of the gauge is designed to create the 3-1/2″ HST blocks used in this month’s block.

- Depress the button on the sliding portion of the gauge and move to the 3-1/2″ HST icon on the left side of the gauge.
- Place gauge on the block set, corner to corner. Match corner marks of gauge with corner of block sets. Mark fabric through center of gauge with a fine-point, fabric-marking pen.

![]() The advantage of using the No-Hassle Triangle Gauge is accuracy. It’s easy to double check that the block set fits within the confines of the gauge. If the block set extends beyond or is shorter, trim or cut another block.
The advantage of using the No-Hassle Triangle Gauge is accuracy. It’s easy to double check that the block set fits within the confines of the gauge. If the block set extends beyond or is shorter, trim or cut another block.
Stitch Half-Square Triangle Block Sets
- Attach a 1/4″ patchwork/quilting foot to your machine.
- Set machine for a straight stitch, 2.0–2.5 mm in length.
- Align foot along one side of the center marked line; stitch a scant 1/4″ from center marked line. Do not cut the threads.
- Kiss the next block set to the stitched block and chain stitch from one block to the other.

- Clip threads between chain stitched blocks. Rotate blocks 180-degrees. Align foot along second side of center marked line; stitch.

- Clip threads between chain stitched blocks.

- With a rotary cutter, mat, and ruler, cut the blocks apart along centerline markings.

- Press seam allowances toward the darker fabric.

- Create a total of sixteen HST units.
 Create Top and Bottom Rows


- All seam allowances are 1/4″.
- Sew a total of four HST blocks:

- Join pairs of different fabric HSTs together.

- Clip threads.

- Open and press seam allowances in one direction.

- Sew pairs together; locking the center seam allowances.

- Open and press the HST unit.

- Match right sides and lay a dark rectangle along the right hand edge of the HST unit.
- Sew together.

- Open and press seam toward the rectangle.

- Add the remaining HST unit on the right.


- Open and press seam toward the rectangle.

- Repeat these steps to create the identical bottom row.
 Stitch the Center Row

- Use the remaining two dark fabric rectangles and light fabric square to create the center row.

- Sew the light square to the right hand side of one rectangle, matching the 3-1/2″ sides.

- Open and press seam toward the darker fabric.

- Add the last rectangle to the right hand side of the lighter fabric square.


- Stitch. Open and press seam toward the darker fabric.
Sew the Block

- Arrange the three rows.

- Fold the center row up, matching right sides, and locking the seam allowances at the center square.
- Stitch.


- Open and press.

- Add the bottom row, matching right sides and locking the seam allowances at the center square.

- Open and press.

Share Your Success!
If you are on social sites, let all your friends know you are working on Nancy Zieman’s 2017 Fat Quarter Mystery Quilt by tagging your post with the hashtag: #NZBoM. Share your finished blocks with Nancy and her team by emailing them to [email protected].
During the 2015 Quilt Adventure and the 2016 Quilt Extravaganza, I shared three virtual quilt designs made with the month’s single block. This year, I’m changing it up and sharing block color variations of one block. Please note that the fabrics required for color-varied blocks will be slightly different than the original block of the month directions presented.
Take Your Block to the Next Level
- Visualize an entire quilt made from this block. Each block will measure 15″ square when sewn into a quilt. The first quilt presented is a the Red Cross block in a traditional on-point setting. Read more on finishing the quilt in my book Fearless Quilting Finishes.
 Note from Nancy: Create the dark fabric stars easily by simply adding two triangles to each end of your sashing. Cut the cornerstones from the same dark fabric and instantly, stars will appear. Here’s what the long sashing block, in this case 15-1/2″ x 3-1/2″, looks like:
- Notice the subtle differences in these four color variations of the Red Cross block.


Virtual concepts presented in this post are created using Electric Quilt 7 (EQ7) software, available at Nancy’s Notions.
Watch Fearless Quilting Finishes on Sewing With Nancy online.
If you missed any of the complete block tutorials, find the 2017 Fat Quarter Mystery Block of the Month on my blog.
Watch for the August Block of the Month on Saturday, August 19th.
Bye for now,
![]()


Marty
Thanks, Nancy: I really like this Red Cross block! I’ll use it as the only block pattern in a quilt with rectangles of varied hues (perhaps going light to dark in value for the block layout) and with no sashing so the rectangles connect.
DebbieW
My favorite block is using the tan cross and red center, with corner blocks of red on-point squares with a light background.
SCarter
I love the fabric and pattern for your block of the month.
Julie Kill
I like this Pattern! I am hoping to use it to use up some scraps. I think it would be interesting with other colors also…..
Linda Height
Love the July block of the month. In fact love all of them. I so want to see how this quilt top finishes. Thank you Nancy for providing us with this project.