
2016 Quilt Extravaganza – April Block of the Month by Nancy Zieman
The fourth block of the 2016 Quilt Extravaganza is here! This month, you’ll learn how to create a contemporary quilt block, featuring semicircles machine appliquéd to the scrappy background fabrics. Use the Carefree Curves Template to create the shapes easily and without setting in any curved seams.
Have you selected fabrics and created the strata for your 2016 Block of the Month? Check out the details in the January 9 blog. I encourage you to use as many scraps from your stash as possible. I’m using bright and neutral fabrics in this quilt.
 All blocks for 2016 will be created from pieced fabric strata. Read more on this blog post.


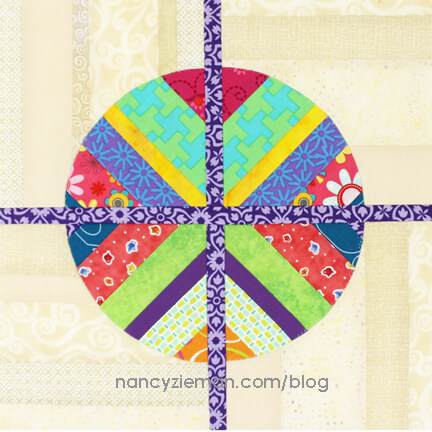
Block #4: Angled Quarter Circles
Supplies:
- One neutral fabric strata
- One bright fabric strata
- Lightweight fusible interfacing
- Point 2 Point Turner
- Trace ‘n Create Carefree Curves Template Set
- Monofilament thread
- Fine Tip Non-Permanent Marking Pen
Cut Fabrics
Cut the following fabric and interfacing pieces:
- Cut four 6-1/4″ x 6-1/4″ squares from neutral strata. (not pictured)
- Cut two different 9″ x 9″ squares from two different bright strata.
- Cut two 9″ x 9″ squares interfacing.

- Cut two 1″ x 6-1/2″ fabric dividing strips (horizontals)
- Cut one 1″ x 12-1/2″ fabric dividing strip (vertical)
Create the Semicircles
- Make two circles from each bright interfacing square by layering interfacing on the right side of the bright strata.
- Pin.
- Center the Carefree Curves Circle Template on the interfacing.

- Use a fine tip marking pen to trace the quarter circle 6″ finished block onto the interfacing. (This is the pink ring on the template.)
- Straight stitch, using a short stitch length, 2.0–2.5, directly on the marked curve.

- Use a rotary pinking blade to remove excess fabric.

- Remove the excess interfacing from within the circle, leaving approximately 1″ of interfacing.

- Turn the interfacing to the wrong side with a turning tool.

- Press.
 Build the Block

Set the strips on a perfect 45 degree angle with this trick:
- Position the template on the finished circle aligning the horizontal line parallel with strata seams.
- Mark the twelve o’clock and three o’clock positions.

- Place pins in the twelve and three o’clock marks.

- Repeat these steps for remaining bright strata and interfacing.
- Working with one prepared circle at a time, fold circle in half matching pins and wrong sides.
- Press along fold.

- Remove pins. Unfold.
- Move pins to the ends of pressed foldline.
- Fold in half again, matching pins.
- Press along new foldline; unfold and add pins at ends of new foldline.

- Align pins with grid marks on rotary cutting mat.
- Cut along the vertical and horizontally marked lines.

- Choose opposite quarters of the circle.
Note from Nancy


- Repeat these steps for the remaining prepared circle.
- Arrange the block pieces as shown.
Note from Nancy
Notice how the direction of the background strips are turned 90 degrees in each quadrant.

- Layer the quarter circle on the background square by aligning the corners.
- Pin
- Edgestitch with monofilament thread.

- Repeat this step to apply all quarter circles to background squares.
- Using a 1/4″ seam allowance, add a 1″ x 6-1/4″ strip to the lower edge of right and left top quadrants.

- Add the lower right and left quadrants.


- Press seam allowances towards the narrow dividing strip.

- Use a 1/4″ seam allowance to join the center dividing strip to one side of the block.


- Press seam allowances towards the center dividing strip.

- Use a 1/4″ seam allowance to add the remaining side.
- Press seam allowances towards center strip.

- Ta-dah! Another block is complete.
If you are on social sites, let all your friends know you are working on The 2016 Quilt Extravaganza Blocks by tagging your post with the hashtag: #NZBoM.What would a Quilt Look Like?
Suppose we were to make a quilt using only this block style, what would it look like? Digital quilts are made using Electric Quilt 7 (EQ7) software.
- This large, 88″ x 100″ traditionally-set quilt repeats 56 blocks in an expected quilt grid. The sashing in between the blocks is intentionally narrow, finishing at 1/2″, to replicate the dividing strip design in each block. You’ll notice the blocks are turned 90 degrees. If you were to make this quilt in fabric, rather than virtually, the circles will be much more diverse as they’d be cut from various bright strip sets.

- The second digital concept quilt uses the block presented and a secondary block created from this month’s directions. The secondary or Plus Block mimics the original design, though the quarter circles have been omitted.

- The last digital quilt builds on the two previous designs. Isn’t that often the case? This last modern quilt concept is set on a traditional grid and features four different quilt blocks: 1. Quarter Circle Block, 2. Plus Block (described above), 3. Single Line block, 4. Neutral Strata Block. See if you can find all four.

Watch Quilt with Carefree Curves (Part One and Part Two) on Sewing With Nancy online.
To watch Sewing With Nancy on your iPad, iPod Touch, or iPhone, download the app.
Sew and Share
Send in a photo of your blocks and quilts and we’ll share with others in upcoming blogs and on Facebook. I’d really like to see what fabrics you’re using! Send the images to [email protected]
Bye for now,
![]()


Barbara
I just love this scrappy block, I have a layer cake of Tonga brights. All solids I am going to try this for a baby quilt I need to make. Thank you for your ideas.
Maryam
I live it so much.sepecialy by colorful fabrics like this.
Thank you for sharing
Barbara Saunders
Thank you for your generous spirit and all that you have done for so many years. I have benefitted immeasurably from your ideas and attitude.
I have an idea that I would love a dressmaker’s ruler for doll clothes. I am often designing and I have photocopied my large one, but even as a transparency a real one would be better. I am usually sewing for the 18 in doll.
Thank you again for all you have, and continue to, contribute to my life.
Barbara
Amy S
The last modern-style quilt shown above is particularly striking. I’m quilting along this year using sherbert bright strata and grey strata for the neutral colors. I believe that combination would be particularly beautiful in a similar layout with the four different blocks. Very inspiring!
Corinne
This month’s block gave me fits. There are multiple errors in the instructions. Where to start?
1) You are instructed to cut 8 1/2″ squares from the bright strata. That is not large enough to to then “trace the quarter circle 6″ finished block.” I had to cut bigger squares.
2) After the circle is turned right side out and the interfacing pressed, there is a picture of a neutral strata circle getting an interfacing circle pressed to the back of it. I believe that picture is not supposed to be there.
3) After the quarter circles are sewn on the 6 1/2″ neutral squares, you are instructed to attach the 1 ” strips. That results in a 13″ block, with a 12 1/2″ strip in the middle of it. All the other blocks prior to this measure 12 1/2″.
Do I dare try May’s block?
Nancy Zieman
Dear Corinne,
I must begin with an apology. You are correct, we certainly made three errors in the April Block of the Month. I’m sitting at my desk feeling extremely embarrassed, yet thankful that you graciously called out attention to the errors.
We have made the corrections on the April blog as following.
1. Thee squares from the bright strata should be cut 9″, not 8-12″.
2. There is an incorrect photo in the blog which is now removed.
3. The neutral background squares should be cut 6-1/4″, not 6-1/2″.
My staff is double checking the instructions of May, June, July, and August.
I am deeply sorry for the inconvenience that I have caused you and other.
Kind Regards,
Nancy
Corinne
Thanks Nancy for making the corrections. I was able to cope with the errors. A less experienced sewer might have had issues. I can easily trim my block down to 12 1/2″, so I’m not behind. And I will indeed try the May block.