
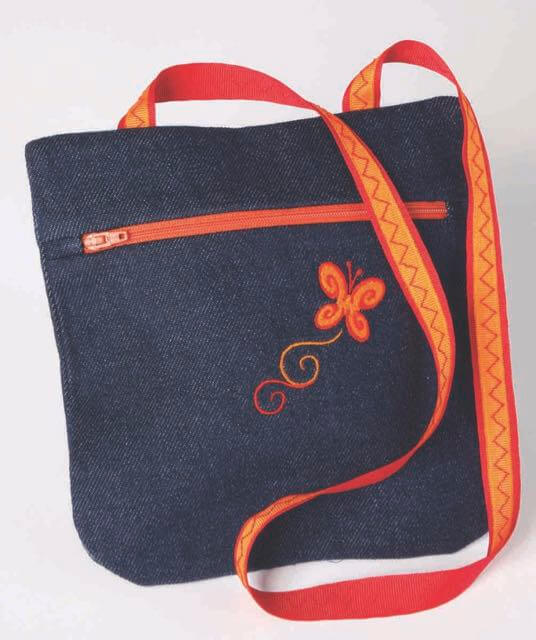
I Sew For Fun Project Tutorial: Shoulder Bag
Introduce your youth sewing partner to sewing zippers. Choose 3/8 yd. denim-weight fabric, two 1-yard cuts of ribbon, a coordinating 12″ zipper, and stitch this Easy Shoulder Bag. FREE! I Sew For Fun Shoulder Bag Tutorial by Nancy Zieman.


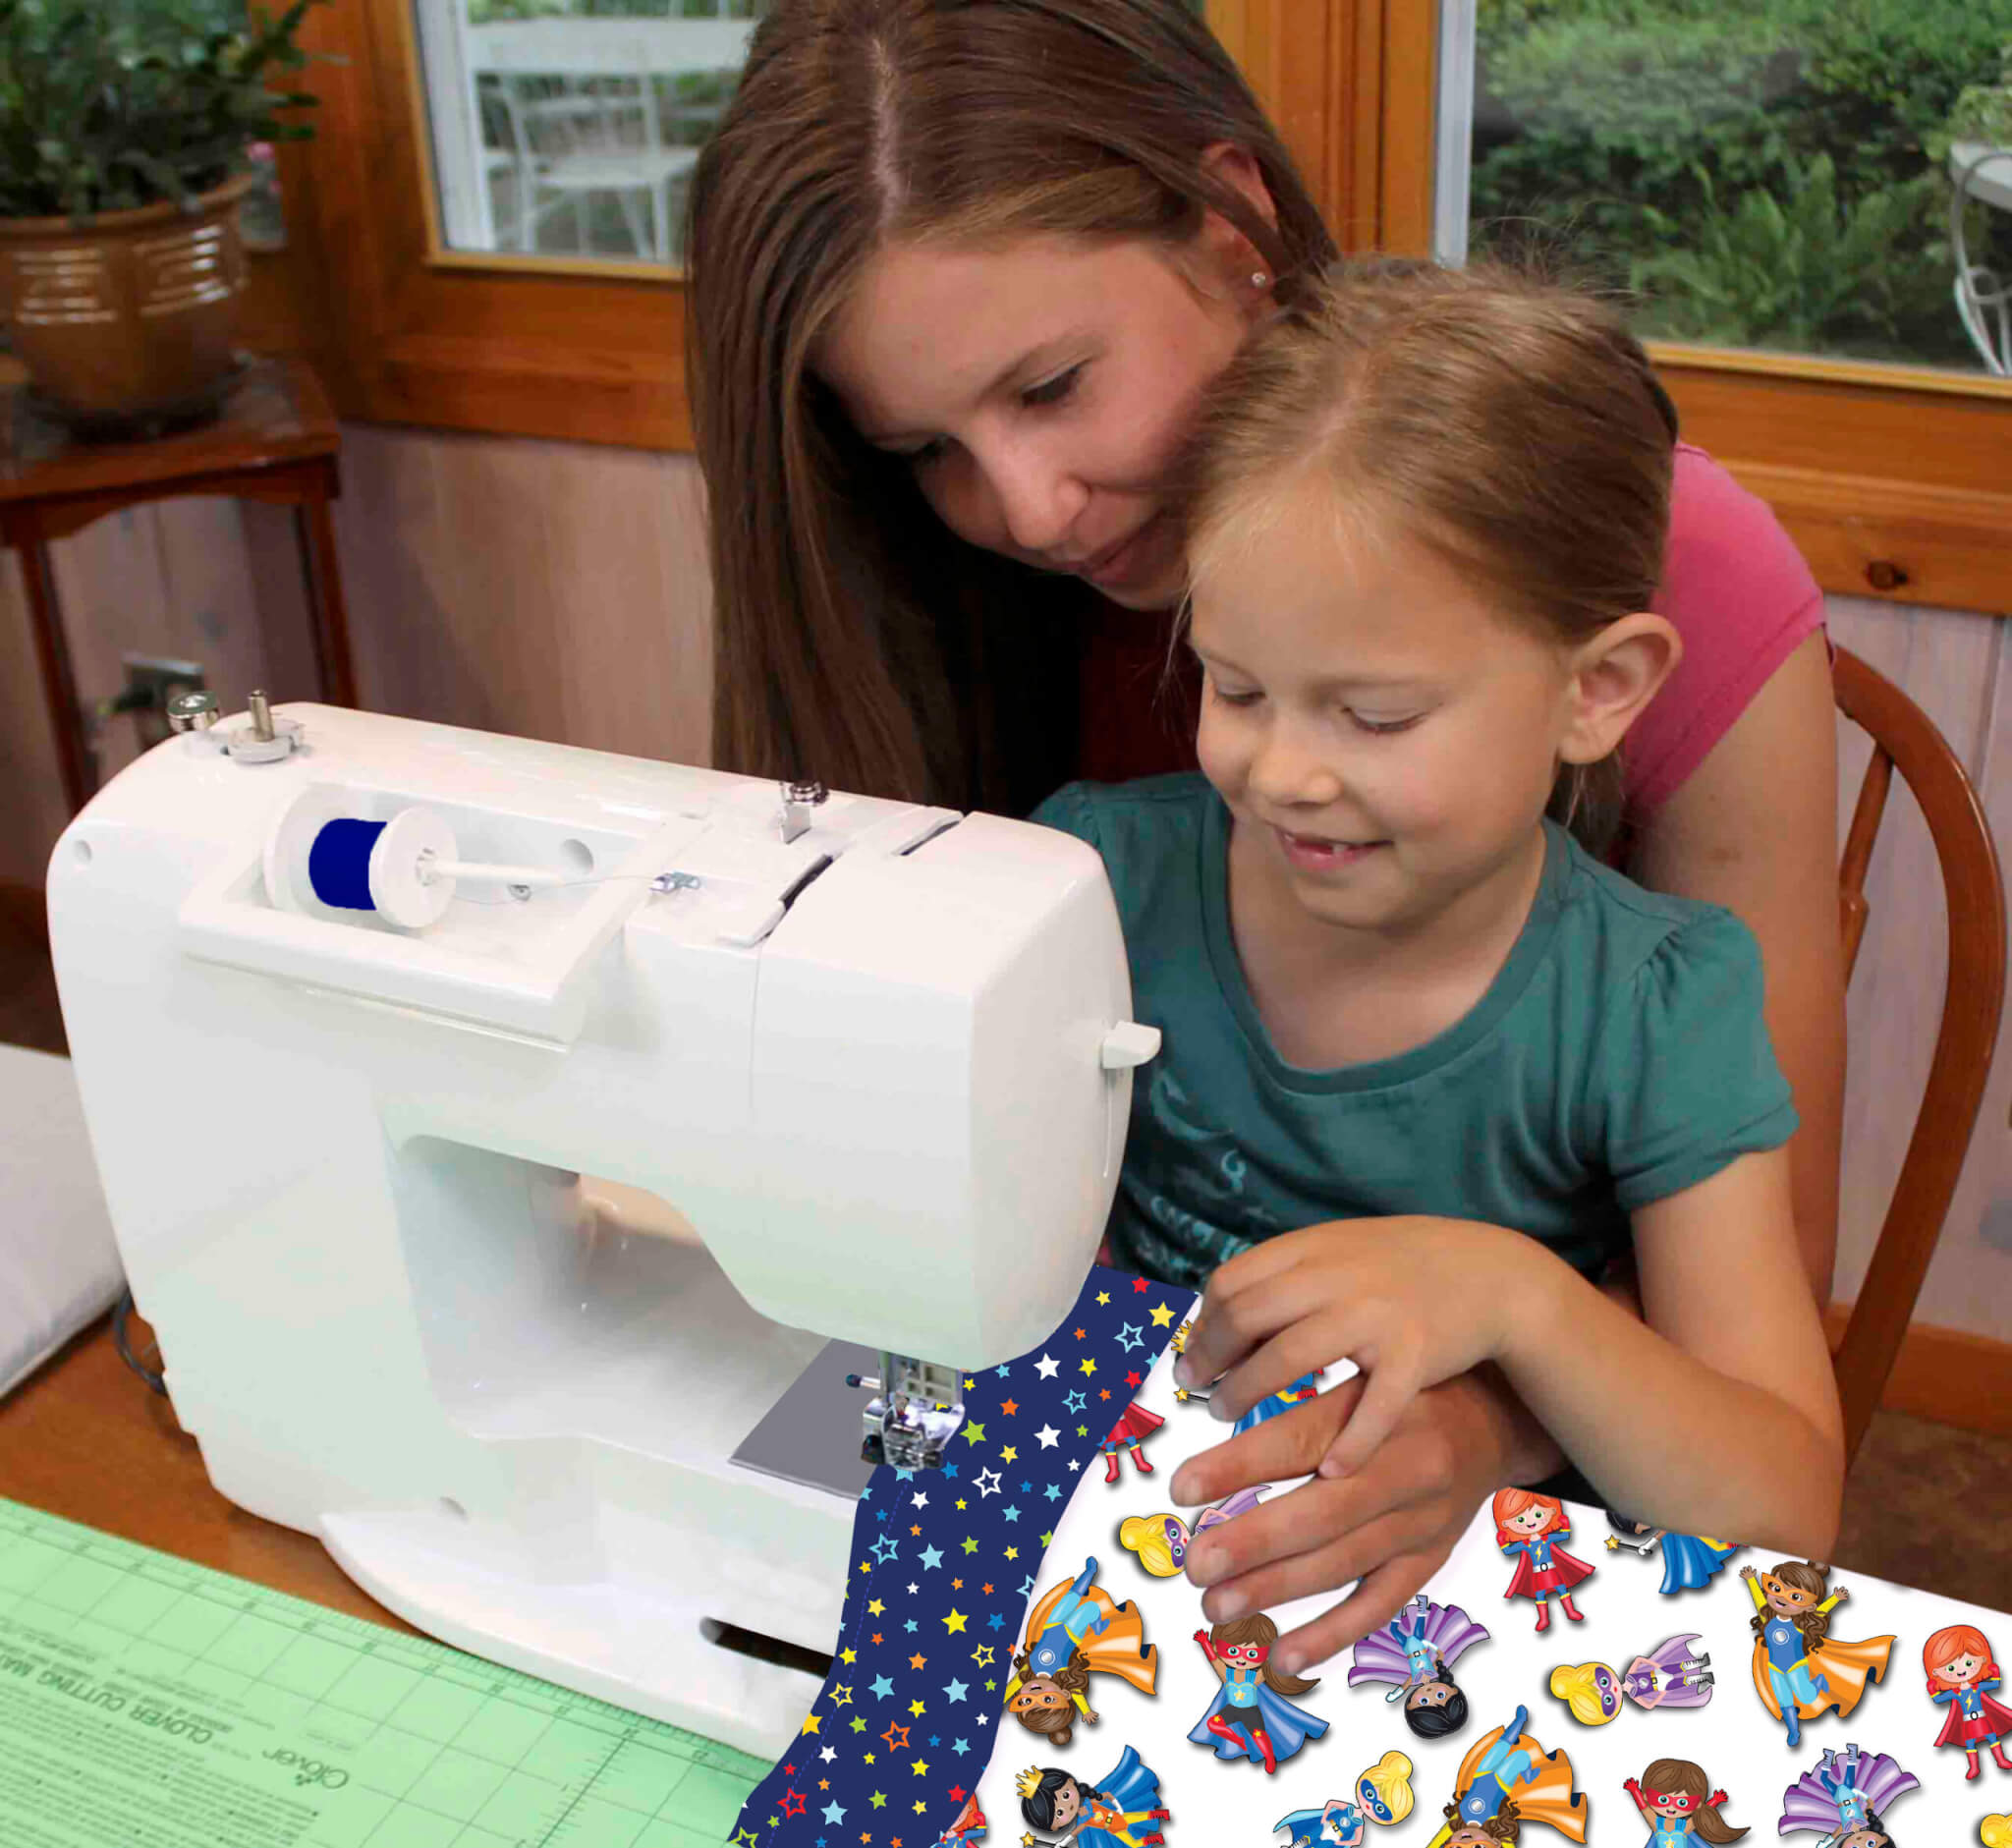
Tune in and watch Nancy and her granddaughters, along with friends, take a modern approach to sewing. Nancy shares her team sewing-for-fun experience along with many tips for a big partner, and numerous insights for involving a little sewing partner—all while making simple, easy to sew kid-friendly projects. Watch I Sew For Fun on Sewing With Nancy!
Shoulder Bag Sewing Tutorial
Here’s a stylin’ denim shoulder bag with streamlined shoulder straps and an easy zipper technique. The machine embroidery is optional. Kids love to be part of the embroidery process.
Approximate finished size: 8″ x 8-1/2″ excluding strap
Supplies Needed:
- 3/8 yd. denim or cotton duck canvas
- 1 yd. 7/8″ wide grosgrain ribbon
- 1 yd. 3/8″ wide grosgrain ribbon
- 12″ nylon coil zipper
Optional Notions:
- Optional: Paper Glue stick
- Optional: Machine embroidery design
- Optional: Stabilizer to back embroidery design
- Optional: Embroidery thread
- ·Optional: Embroidery needle
Optional:<a%20href=”https://shopNZP.com” target=”_blank” rel=”noopener noreferrer”> I Sew For Fun Notions:
- I Sew For Fun <a%20href=”https://shopNZP.com” target=”_blank” rel=”noopener noreferrer”>Heart-Shaped Pins
- I Sew For Fun Wonder Clips
- I Sew For Fun <a%20href=”https://shopNZP.com” target=”_blank” rel=”noopener noreferrer”>Sew Safe Presser Foot
- I Sew For Fun <a%20href=”https://shopNZP.com” target=”_blank” rel=”noopener noreferrer”>5-in-1 Sliding Gauge
<a%20href=”https://shopNZP.com” target=”_blank” rel=”noopener noreferrer”>
Instructions:
Please read all instructions before beginning. Use the width of the presser foot as the depth of the seam allowances.
1. Prepare and cut fabrics.

- Using a rotary cutter, ruler, and mat, cut:
One 2½” x 8½” rectangle (upper front)
One 6½” x 8½” rectangle (lower front)
One 9″ x 8½” rectangle (back)
Two 3″ squares (zipper ends)

2. Prepare ribbon strap.
- Stack and center ⅜” wide ribbon on length of ⅞” wide ribbon. Secure with pins, Wonder Clips, or glue stick.

- Stitch ribbons together lengthwise using a decorative stitch.
<a%20href=”https://nancyzieman.com/blog/wp-content/uploads/2016/07/Note-From-Team-Nancy.png”> You’ll find many decorative stitch options to use. Test out several on fabric before choosing one for the bag.
3. Optional: Add machine embroidery.
<a%20href=”https://nancyzieman.com/blog/wp-content/uploads/2016/07/Note-From-Team-Nancy.png”>The world of machine embroidery is stimulating, satisfying and exciting. Your embroidery machine has an amazing wealth of options and designs, just waiting for the two of you.

- Position embroider design on lower bag front, allowing sufficient space around design for zipper and side seam allowances.
- Stitch machine embroidery design on bag front following manufacturer’s instructions
4. Attach zipper.

- Align 3″ fabric squares, right side up, along each side of the width of the lower bag front. Center zipper, right side down, over squares. Note: Make certain the zipper pull is in between the two 3” fabric squares as illustrated. (Later you’ll turn the bag inside out through the zipper opening.)

- Wrap fabric square around zipper and . Repeat with opposite upper edge of lower bag front.

- Mark 1″ from both sides over the zipper/fabric. Carefully remove zipper from lower bag front after marking.

- Stitch through zipper and wrapped fabric at markings.

- Trim ¼” from outside of stitching.

- Turn fabric on zipper ends right side out.

- Align zipper to top edge of bag, meeting long edges, right sides together. Stitch, guiding edge of presser foot with cut edges.

- Turn zipper right side up and edgestitch along fold.
- Attach upper bag front piece to remaining edge of zipper using pins or Wonder Clips, meeting long edges, right sides together.
- Stitch, guiding presser foot with cut edges.

- Turn upper bag right side up and edgestitch along fold.

- Trim fabric extending from zipper even with bag.
5. Add shoulder strap.

- Secure ribbon to upper edges of bag front using pins or Wonder Clips, right sides together. Ribbon should be 2″ from side edge of bag. Make sure ribbon is not twisted.

- Baste strap to bag.
6. Complete bag.

- Use chalk to trace rounded edge of coffee mug on wrong side, lower edge of bag back.

- Pin or use Wonder Clip to hold bag front and back, right sides together, aligning cut edges. Make sure zipper is open and the ribbon strap is not caught in the bag seam allowance!

- Stitch, beginning at one upper edge, and ending at the other upper edge. Trim excess fabric from curves.

- Wrap seams toward center, folding along stitching line.

- Stitch seam across upper edge, starting at fold.

- Angle cut seam allowances at corners.
- Turn bag right side out through zipper opening.
Tune in and watch Nancy and her granddaughters, along with friends, take a modern approach to sewing. Nancy shares her team sewing-for-fun experience along with many tips for a big partner, and numerous insights for involving a little sewing partner—all while making simple, easy to sew kid-friendly projects. Watch I Sew For Fun on <a%20href=”https://wpt4.org/wpt-video/sewing-nancy/i-sew-for-fun-qomp0c/” target=”_blank” rel=”noopener noreferrer”>Sewing With Nancy!
<a%20href=”https://wpt4.org/wpt-video/sewing-nancy/i-sew-for-fun-qomp0c/” target=”_blank” rel=”noopener noreferrer”>![]()
Watch I Sew For Fun on Sewing With Nancy online at NancyZieman.com.
<a%20href=”https://wpt4.org/wpt-video/sewing-nancy/i-sew-for-fun-qomp0c/” target=”_blank” rel=”noopener noreferrer”>
Visit ShopNZP.com for our selection of I Sew For Fun Products by Nancy Zieman.

Enter the NEW! 2019 Nancy Zieman Productions Fall Sewing Challenges!
<a%20href=”http://www.nancyzieman.com/blog/i-sew-for-fun/new-i-sew-for-fun-kids-sewing-challenge-part-two-cinch-sack-sewing-steps/” target=”_blank” rel=”noopener noreferrer”>![]()
All youth, age 15 and under, are invited to participate in the NEW! 2019 I Sew For Fun Kids’ Sewing Challenge! Enter the challenge by purchasing the Official 2019 I Sew For Fun Kids’ Sewing Challenge Cinch Sack Kit, at the NEW! NZP Shop. Quantities are limited! Find challenge details in the September 30th NZP Blog Posting.
Show us What You’re Making! We love to hear from you, so whether you’ve tried one of Nancy’s Sewing Patterns, or you’re planning on stitching a project you’ve seen on Sewing With Nancy or on The Nancy Zieman Productions Blog, share your experiences and photos with us on Facebook or Instagram!
Happy Sewing!
Team Nancy Zieman
Nancy Zieman Productions. LLC.
![]()


diane c
I can’t wait until my granddaughter is old enough to learn. She is still working on how to walk at this time.
Joyce
This shoulder bag would be a great project!
Lorraine Alves
The shoulder bag would be perfect for my girls. They carry their dolls and doll clothes every where they go. The bag would be a terrific carryall for the clothes.
Lynn P
Someday I would love to share my sewing skills with my three little grand-daughters. As of right now they’re just a bit too young!
Clovis
Lovely little bag with a cute butterfly.
Shirley Clark
I love all of these tutorials! I also love and need all the seam rippers I can lay my hands on! LOL
Dixie
I plan to make a shoulder bag with my granddaughter.
Joanna
The bag is perfect for granddaughters: jr. college; jr. high & preschool (with some room left in the preschool one for a few stuffed friends).
Barb K
My youngest Granddaughter has a small quilt started when she visited me–will continue sewing on it in the future.
Sandra N
I will be helping my granddaughter make a bag. She is so excited to sew!
Linda Johnson
I love the shoulder bag with zipper. I will be making this bag with my Charlotte. Thanks for the info.
God Bless, Linda J.
Carla
I will be sewing with my grandson’s girlfriend as this is a perfect bag for her as she is going to college. She has no sewing background so this should be interesting. Thanks for the tutorial. I just love the bag.
Suzy C
The step by step instructions look like they are easy to follow. I will be making this project this week since I have been wanting a small purse to carry during my travels…
Susan
Christmas ornaments are the plan with my grandchildren to create keepsakes. Plan to let them pick out fabrics and have simple templates to cut out shapes & then sew them.
Jean Morgan
This will be the perfect project for the youngsters I teach at the local Rec. Centre. I have always wanted a more neat way to install a zipper and this certainly it! Thank you so much Nancy, I miss you on my local PBS station every week.