
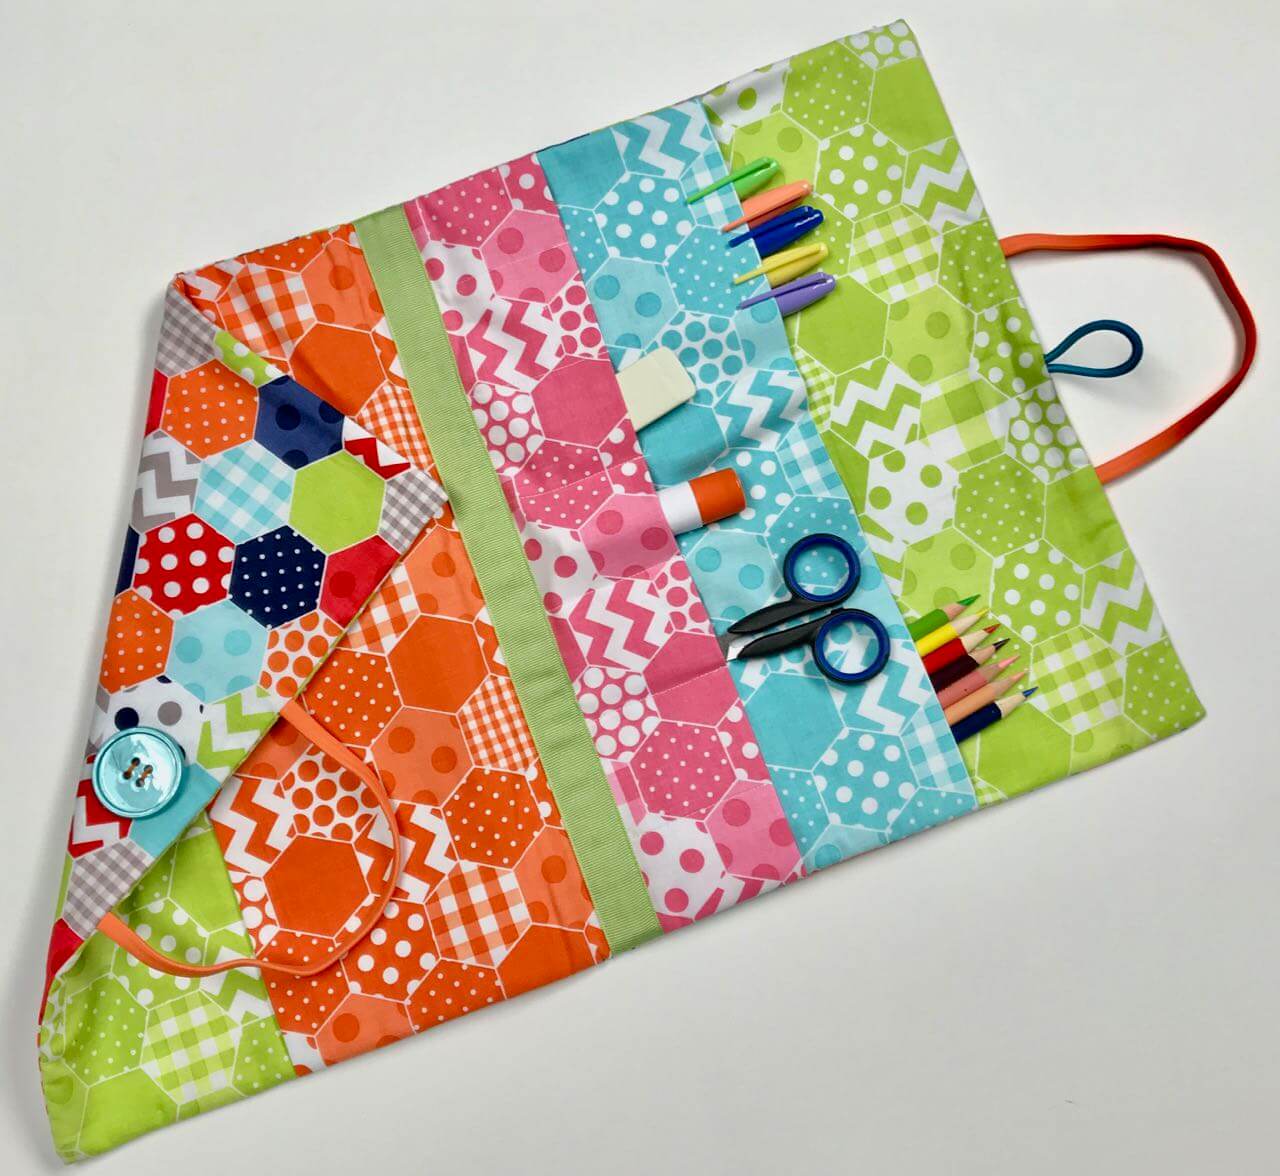
I Sew For Fun Project Tutorial: Art Caddy
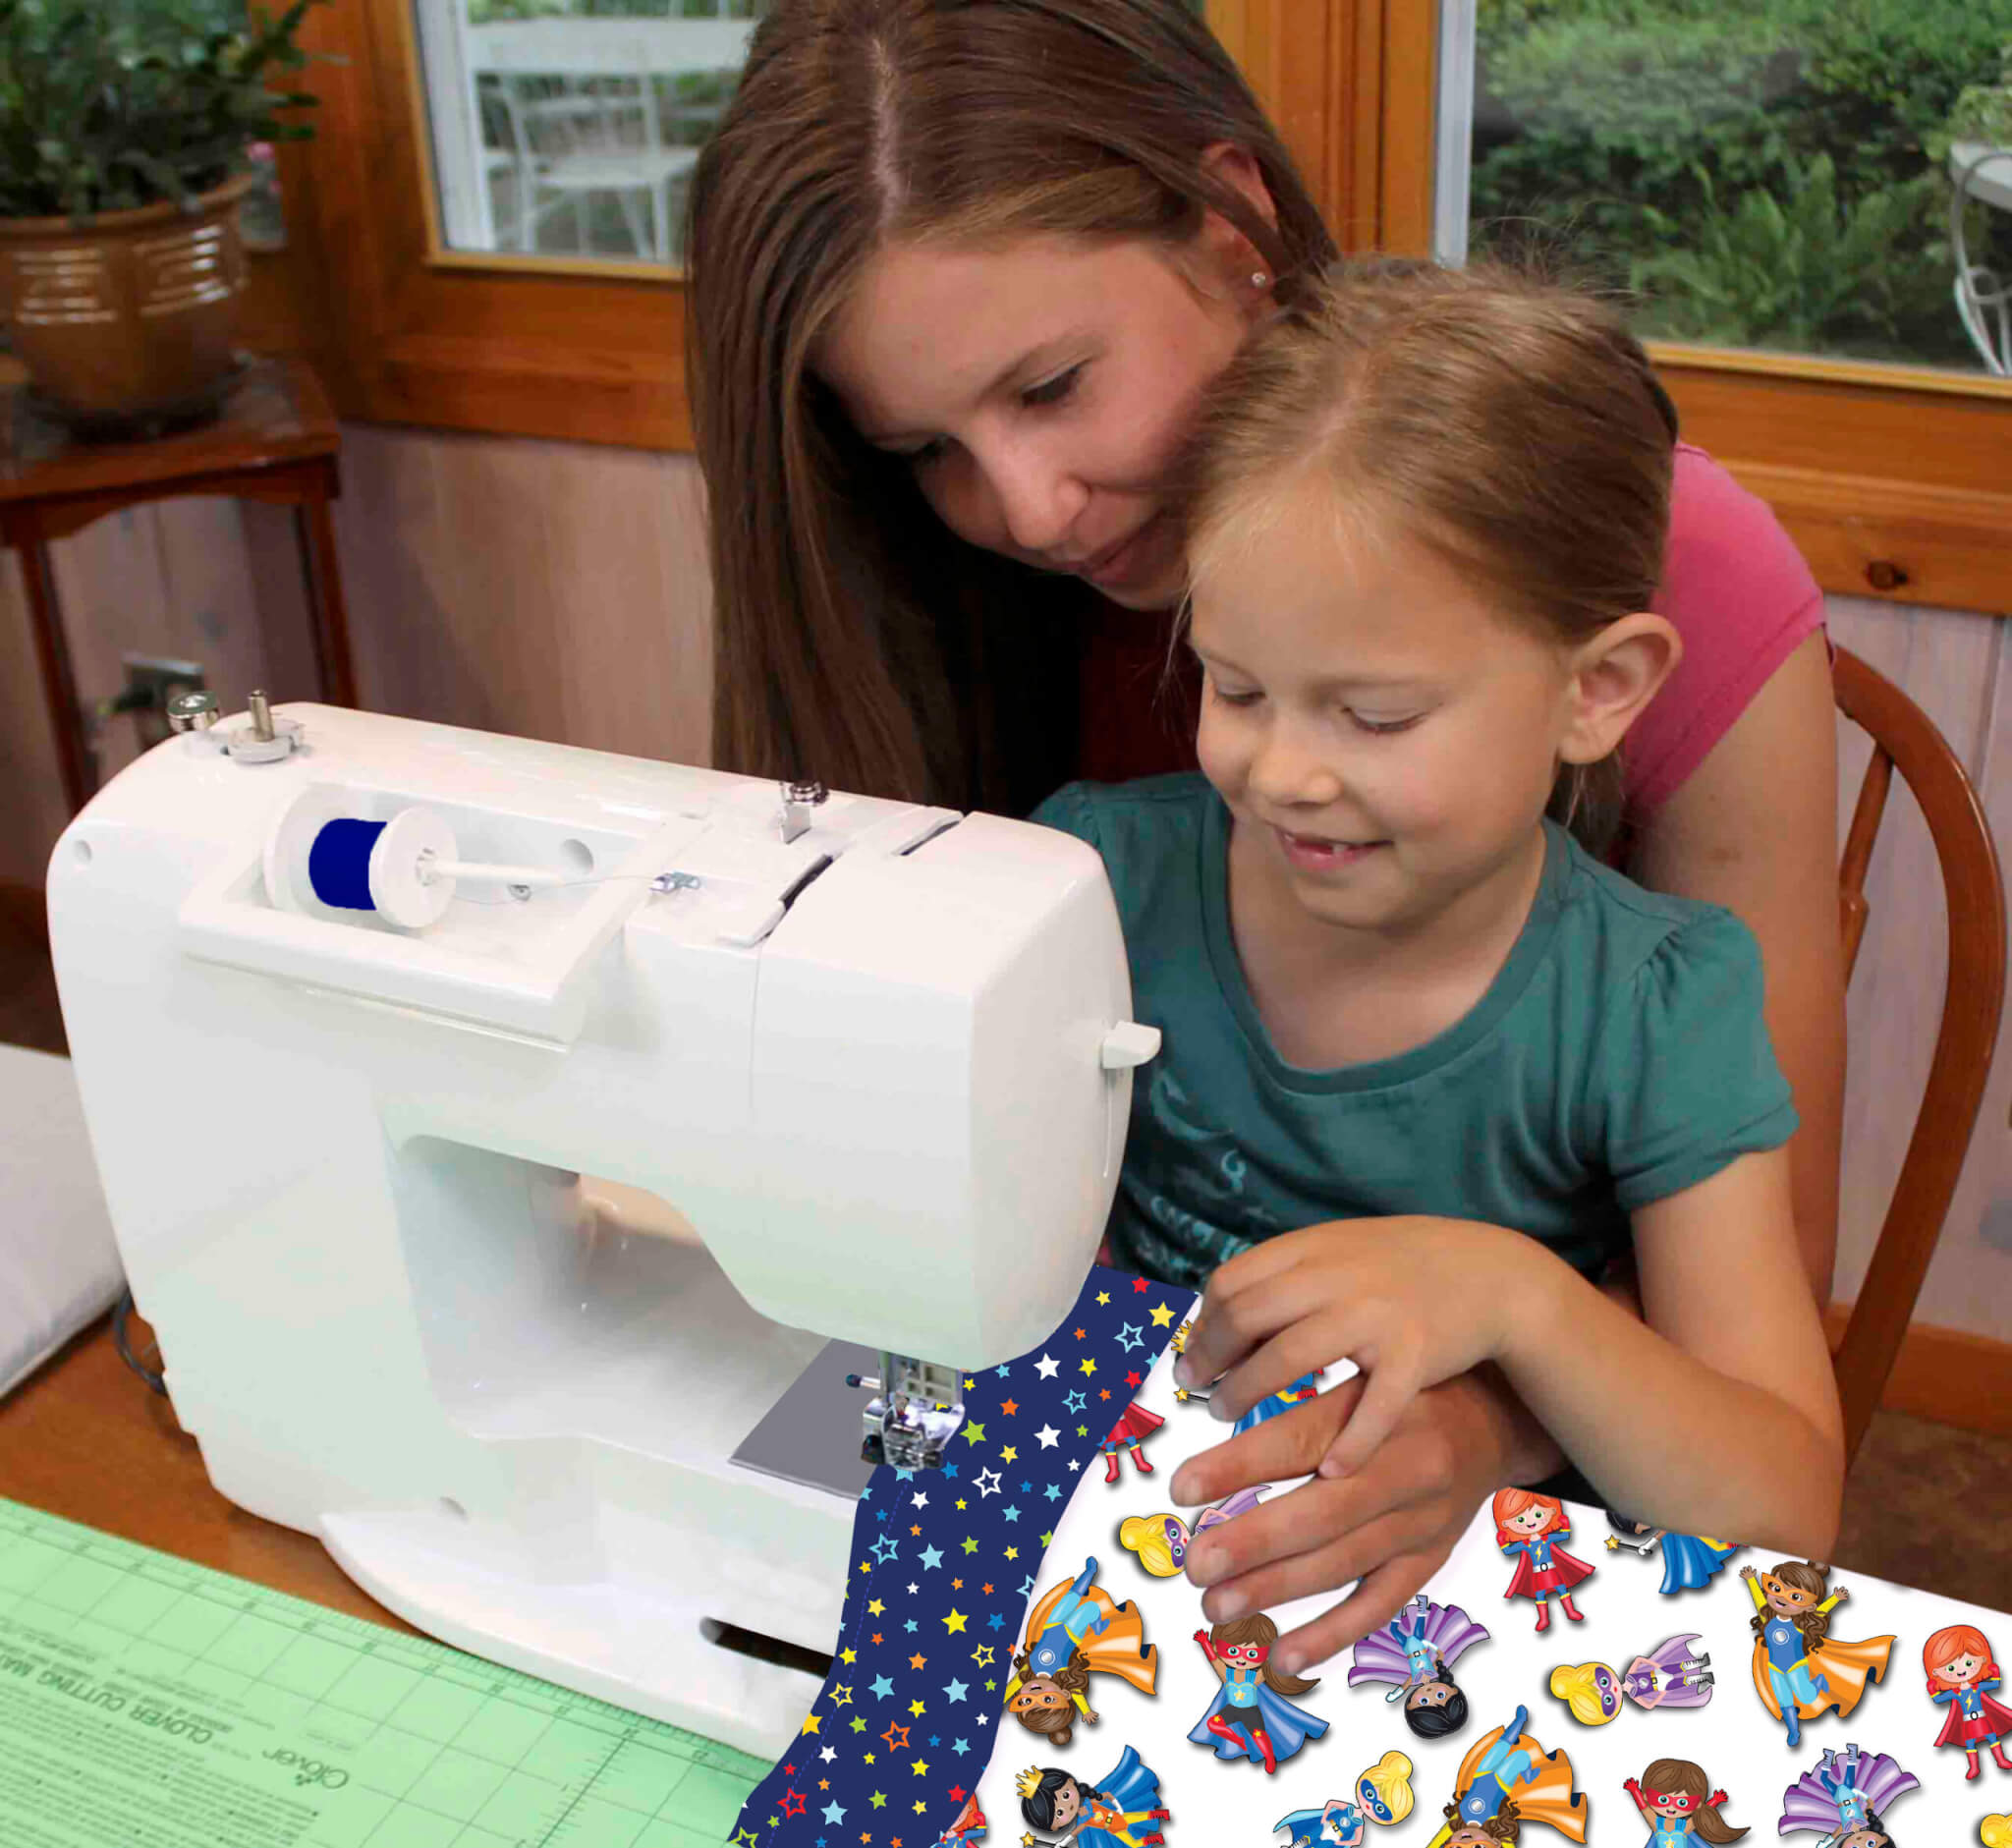
Do you have a fat quarter pack of fun fabrics and an a few hours to spend with your little sewing partner? If your answer is “YES,” then we have an artistic sewing project for you. Stitch an Art Caddy made up of rectangles, ribbon and hair accessories with this FREE! I Sew For Fun Art Caddy Tutorial by Nancy Zieman.


Tune in and watch Nancy and her granddaughters, along with friends, take a modern approach to sewing. Nancy shares her team sewing-for-fun experience along with many tips for a big partner, and numerous insights for involving a little sewing partner—all while making simple, easy to sew kid-friendly projects. Watch I Sew For Fun on Sewing With Nancy!
Art Caddy Sewing Tutorial
Approximate Finished Size: 13″ X 20″
Supplies Needed:
- Five coordinating fabrics at least 14″ x 21″ each.
- One 14″ x 21″ rectangle Pellon Fleece batting
- 1/2 yd. 1″ grosgrain ribbon
- One 1-1/2″ decorative button
- One ponytail elastic
- One elastic hairband

Optional: I Sew For Fun Notions:

Instructions:
Please read all instructions before beginning. Use the width of the presser foot as the depth of the seam allowances.
1. Cut and label fabrics:
- Cut two 14″ x 21″ rectangles for caddy outer panel and lining.
- Cut two 12″ x 14″ rectangles for large pockets.
- Cut one 6″ x 14″ rectangle for divided pocket.
- Cut one 14″ x 21″ rectangle for fleece batting.
2. Prepare and position pockets:
- Fold each pocket piece in half, wrong sides together, aligning 14″ edges. Press.
- Make dividers for crayon pocket:
- Layer 3″ x 14″ pocket on top of one 6″ x 14″ large pocket on a flat work surface, aligning cut edges.
- Mark; then stitch dividers 2″ apart on short pocket. Reinforce stitching at top edges of pockets.


- Position pockets on caddy lining:
- Fold lining fabric in half, aligning 14″ edges. Press-mark center fold of lining fabric.
- Unfold lining and layer it on top of the fleece batting, aligning cut edges.
- Place large pocket on the caddy lining, matching long cut edges with press-marked center of lining; pin to secure all layers.
- Place crayon pocket on caddy lining with divided pocket facing up, matching long cut edge with pin-marked center of lining; pin.

- Baste layers together, stitching and guiding presser foot along each side of the caddy, starting at the top of one pocket and ending at the top of the opposite pocket.

- Add the ribbon center:
- Pin grosgrain ribbon across the center of caddy lining, covering cut edges of the pockets.

- Edgestitch along both long edges of the ribbon, stitching through all layers.

3. Prepare and attach handles:
- Fold top edges of the caddy in half; place a pin at each center fold mark.
- Measure and mark 2″ from each side of the center marks.
- Align cut edges of band at the 2″ marks; pin or use Wonder Clips to secure.

- Stitch across elastic ends.
 Hairband elastic is perfect for this project because it is sturdy and colorful. Plus, it is easy to find.
4. Prepare and attach button loop:
Ponytail elastic works great for this large button loop. It is sturdy, like the hairband elastic, but smaller, so there is hardly any waste. Again, it comes in lots of colors!
- Cut metal from the elastic ponytail holder.
- Make a loop of the elastic.
- Align cut edges at one center mark; pin.
- Stitch across elastic ends
5. Stitch the caddy:
- Place the caddy outer panel on top of caddy lining, right sides together, matching cut edges.
- Stitch all four sides, guiding presser foot along the edges, leaving a 4″ opening on one long edge. Pivot at each of the corners.

- Clip corners.
6. Complete the caddy:
- Turn caddy right side out through opening in side seam. Push out corners with Point 2 Point turning tool.

- Turn under the seam allowance in the 4″ opening and secure with pins or Wonder Clips.
- Slipstitch the opening closed.

- Center and stitch a button between the handle opposite loop closure.


Tune in and watch Nancy and her granddaughters, along with friends, take a modern approach to sewing. Nancy shares her team sewing-for-fun experience along with many tips for a big partner, and numerous insights for involving a little sewing partner—all while making simple, easy to sew kid-friendly projects. Watch I Sew For Fun on Sewing With Nancy!
![]()
Watch I Sew For Fun on Sewing With Nancy online at NancyZieman.com.

Visit ShopNZP.com for our selection of I Sew For Fun Products by Nancy Zieman.


To win a NEW! I Sew For Fun Point 2 Point Turner from Clover, please leave a comment below sharing a sewing project you’ll be stitching with your little sewing partner.


The randomly selected winner of a set of eight Landscape Quilt Note Cards by Nancy Zieman, is Sheelagh.

Her comment is: Front Porch is my favorite—reminiscent of a beautiful summer day.
The randomly selected winner of the July Enews Afternoon Picnic Fat Quarter Pack! is, Ruth Burns.

Happy Sewing!
Team Nancy Zieman
Nancy Zieman Productions. LLC.
![]()


Carrie
My granddaughter loves making rag quilts when she sees with me. Can’t wait to see where her sewing will go!
Joyce
The Art Caddy is a perfect project, and so useful.
Nancy
My great niece wants to make a quilt during next summer’s visit.
Dixie
I would like to make the art caddy with my granddaughter.
Clovis
An Art Caddy would be good for adult/child to use.
Therese Bocchino
What a cute project! Who couldn’t use one of these. I have 3 small grandchildren 6, 4 & 2, so I guess I am making 3 of them! What fun to pick out fabric with them-all individual tastes.
Anne Z
I love the art caddy, esp. because it travels easily.
Barb K
My Granddaughter started a small quilt of squares when she last sewed with me–We may be able to work on it again in a few days!
L H
Love it. So cool.
Karen King
This art caddy sounds easy and will provide lots of fun, without an ipad!
Carolyn T
We have everything we need for an Art Caddy! I especially love the lesson of having supplies stored together for quick 10-20-30 minute projects!
Lee Ann B
My granddaughter is a budding artist taking Art lessons from her neighbor. I would love to make her this to hold her supplies.