
The Absolute Easiest Way to Sew a Lapped Zipper
A lapped zipper gives a tailored look. Only one line of stitching shows on the right side of the fabric. It’s easier to keep the stitching straight and to make sure the zipper teeth are completely covered. I prefer the lapped zipper for side openings and sometimes back openings.
1. Increase the zipper seam allowance to 1”, before cutting out your clothing. For example, if the pattern allows a 5/8” seam allowance, add 3/8” to the seam in the zipper area.
 2. Mark the 1” seamline at the top of the zipper opening on both the left and right seam allowances. These markings are very important.
3. Stitch the seam below the zipper opening, stopping at the dot that marks the zipper opening and its wider seam allowance. Lock your stitches at the dot by sewing in place several times with the machine’s stitch length set at 0.
4. Press the seam.
- Press the seam open below the zipper opening.
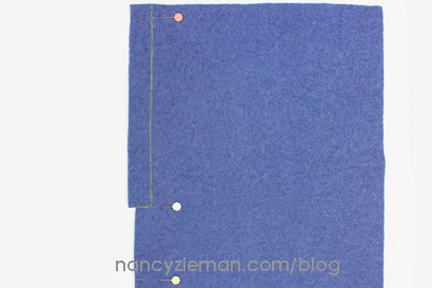
- On the left side, fold and press under the entire 1” seam allowance in the zipper area. Use the marking and the lower end of the zipper opening to position the foldline.

- On the right side, press under 7/8” of the 1” seam allowance to create the zipper underlay. The finished zipper laps left over right.
 5. Insert the zipper.
- Position the closed zipper under the zipper underlay, with right sides up, placing the bottom of the zipper at the base of the zipper opening. Place the underlay fold next to the right side of the zipper teeth. Make certain the zipper tab extends above the top of the clothing. With short zippers, you shouldn’t have to pin the zipper—you can merely finger pin (hold the zipper in place) and stitch.
Note from Nancy: Pins sometimes create dimples in the fabric, causing uneven stitching. Instead of pins, use strips of Sewer’s Fix-It Tape or transparent tape about 4” apart to position the lap. This 1/2” wide tape keeps the edge perfectly flat and results in more even topstitching. When you’re finished, you can easily remove the tape, leaving no sticky residue.
- Position the machine’s zipper foot to the left of the needle. Stitch next to the fold, from the bottom to the top.
- Lap the left side of the clothing over its right side, matching the markings. Tape the overlap in place.
6. Topstitch the overlap.
- Align a strip of 1/2” wide Sewer’s Fix-It Tape or transparent tape along the folded edge of the lapped seam allowance. This provides an accurate stitching guide.
- Slide the zipper foot to the right of the needle.
- Beginning at the base of the zipper, topstitch along the bottom edge of the tape and up the side.
- Remove the tape.
7. Complete the zipper insertion.
- Move the zipper pull down into the completed zipper placket.
- Attach the regular (zigzag) presser foot to your machine.
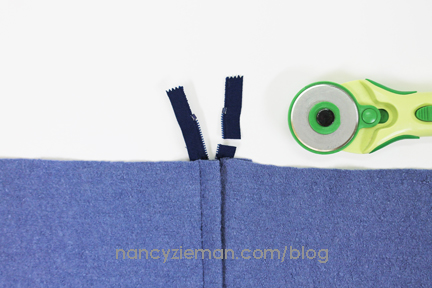
- Satin stitch or bartack over the ends of the zipper tape at the top of the zipper reinforcement.
- Cut off the excess zipper tape.
For more information on this technique and my other absolute easiest ways to sew, check out my book and DVD, The Absolute Easiest Way to Sew at Nancy’s Notions. See a collection of blog posts featuring my absolute easiest ways to sew a variety of projects on this link.
Watch Absolute Easiest Way to Sew (Part One, Part Two, and Part Three) on Sewing With Nancy online.
The random winner of my new McCalls M7331 Knit Collection Pattern is Martha Hood. Her comments from last week’s post were: This pattern has so many different styles. Love the way the jacket looks and hangs. First set would be the ABC clothes. This has been on the bottom of my sewing list for a while. Thanks for the chance to get this pattern.

Bye for now,









Lise
Merci pour la fermeture éclair je devrais l’essayer et ça me sauverais du temps et ce serait beaucoup plus beau merci encore.
Lise
Margaret C.
I have one of your early books. It would be fantastic to win this one. Thanks
Peggy
Thanks for the great zipper tips. This book would be fantastic to win. Thanks again.
Bj Holcomb
i would love to have this book. Looks lot of good knowledge
I hope you see to gift me with this gem.
Starla
thanks for the zipper explaination. tips like this really help me as i learn.
Kim H
Zips should not be so intimidating for people! You have just shown that with this tutorial. I have always wondered why some sewing instructions make it so complicated!!!
Barb Steinmetz
I’ve always been intimated by lapped zippers – thank you for showing this great technique! I will be trying this soon!
Judy
You make this so simple…I wonder what other things I have been making the hard way!
Gail Beam
Love your tutorials! You always make the difficult look so easy with all of your sewing tricks and tutorials.
E. Ann
I love lapped zipper applications too. I normally use middle openings in back seams but loved having this brush up lesson. I plan on using the Sew it Tape to help accomplish even top stitching. Thanks for sharing your knowledge!!
Lynda Adair
I like the tip about adding making the seam allowance to 1 inch. This will give ample fabric to make a neat lap over the seam. I have been using the tape for a while, and it is better than pins and having to baste the zipper.
LadyD
I’ve never used the Sewer’s Fix-it Tape. This looks like an item I need to add to my sewing tool collection
Karen Patterson
Thank you Nancy for teaching me an easier way to put in a zipper!
I use the tape for hemming pockets but hadn’t thought of using it for zippers. Thanks so much! I Would love to have your book. You are such a good teacher.
Ceta Chatordos
I enjoy reading the short cuts and tips sewing the lapped zipper. I live in New York and like to know what channel is your program.I am with Time Warner.
Thank You.
Ceta