

How to Sew a Travel Gear Bag in Three Sizes

Do you like creative stitching projects that can be made in an evening or less? You’re in for a treat! In part two of the TV series, Travel Gear Made Easy, this week’s featured online video, guest Mary Mulari teaches how to quickly stitch travel gear for everyday travel or extended trips. Mary knows all about travel, but even more about making travel easy. Watch the second episode by clicking here. (If you missed the first show, watch by clicking here.)
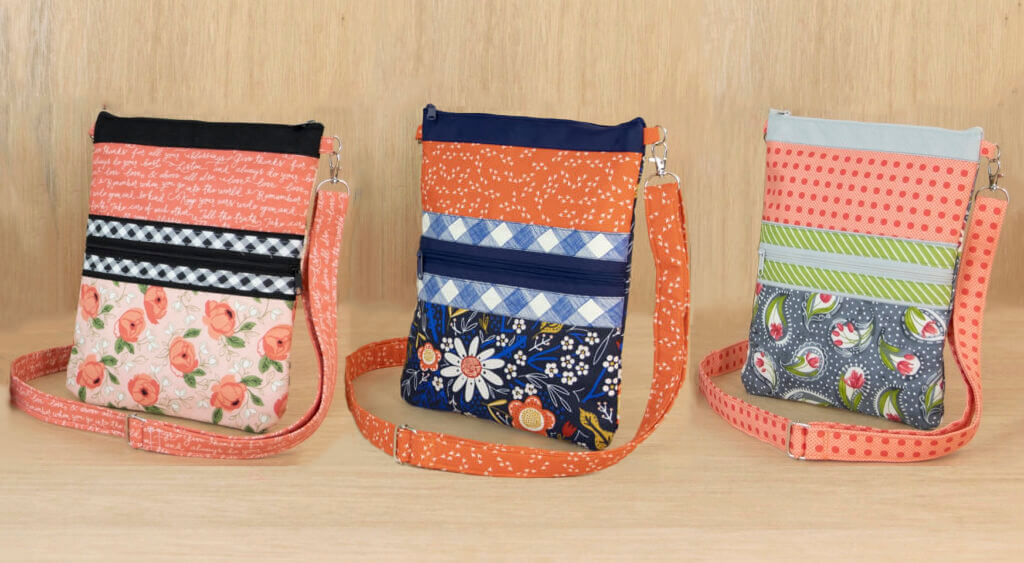
In part two of the TV show, and in her book, Mary shares her easy zipper technique for the hidden zipper used to make the Travel Trio Bag Set (pictured above). The clever recessed zipper adds style to this collection of bags.

A few weeks after Mary and I recorded the Travel Gear Made Easy series, she sent me a package. Inside was my very own Travel Trio Bag Set. Aren’t the fabrics delightful?

Mary designed these bags for carrying electronic components, jewelry, or makeup. Plus, they nest together for gift-giving and for easy storage.

Mary’s here today with a guest blog posting on how to create these nesting bags in three sizes:
Sizes:
- 5″ x 7″
- 8″ x 10″
- 9″ x 13″
Supplies
- 1/2 yd. fabric (outer fabric and lining)
- One 3″ fabric strips (contrasting zipper frame)
- One 2″ x 3″ fabric square (contrasting zipper frame)
- 1/2 yd. medium weight interfacing
- 15″ Designer Renaissance Ribbon 3/8″ wide (5″ per bag)
- Optional: 3″ length of ribbon per bag for zipper pull
- Zippers- to be adjusted for each bag width
- 5-in-1 Sliding Gauge

Cutting
- Cut one bag outer fabric, one lining, and one interfacing to these dimensions:
- 9″ small bag = 9″ x 12″
- 11″ medium bag = 11″ x 16″
- 14″ large bag = 14″ x 18″
Construction
- Fuse interfacing to wrong side of the bag outer fabric.

- Pin the wrong side of the lining to the interfaced side of the outer fabric.

- Zigzag or serge the two long edges.

- Measure, using the sliding gauge, and cut two 2-1/2″ lengths of ribbon, PER BAG.

- Fold each ribbon in half, matching wrong sides.

- Position the folded ribbon 1″ from the cut edge. Baste ribbon to the outer fabric. Add ribbon to right and left sides.

- Fold the bag in half with right sides together, meeting top edges.

- Sew side seams with 1/4″ seam allowances.

- Form a triangle at the bottom corners of the seams.
- Mark across the triangle 1″ for small bag, 2″ for medium bag, and 3″ for large bag. (Large bag is shown.)

- Pin and sew across marked lines to create boxed corners.

Prepare and Apply the Zipper
- Press the zipper flat.
- Measure the zipper length needed (2″ shorter than the bag width).

- Trim the zipper.

- Use a wide zigzag stitch, with a zero stitch length, to bartack over the zipper teeth at the cut end.

- Cut a 2″ x 3″ contrasting fabric strips
- Fold the strip in half. Open.
- Meet the cut edges to the center foldline.
- Press.

- Wrap the narrow folded fabric around the cut end of the zipper.
- Stitch across the zipper end. Note: Be careful not to stitch over the metal zipper stop in the event you didn’t need to trim it.

- Cut two 3″ fabric strips (2-1/2″ for small bags) for each side of the zipper, the same length as the width of the bag. For example, 11″ strips for the medium size bag.
- Press the strips in half, matching wrong sides.

- Pin the fabric folded edges to the right side of the zipper tape, leaving an extra 1″ beyond each end of the zipper.
- Fold over and pin the excess tape at the top end of the zipper to the fabric strip.

- Switch to a zipper presser foot.
- Using left or right needle position, sew each folded fabric strip to the zipper, moving the zipper head away from the presser foot if necessary.

- Meet the right sides of the zipper strips at the corners. Pin together.

- Mark 1/4″ from the cut edges and taper toward the zipper at both ends.

- Stitch the marked tapered line on both ends.


- Trim the seam allowances to 1/4″.
- Press short seams open.
- Press bag side seams open.
- With bag inside out and zipper open, meet the right side of the zipper unit to the right side of the bag. Align and pin the side seams of the zipper unit and the bag.

- Extend the fabric triangle of the zipper unit 1/4″ above the bag edge. Pin all edges together.

- Sew around bag top edge using a 1/4″ seam allowance.

- Trim seam allowance with a pinking shears to eliminate bulk, especially at the side seams.
- Turn bag right side out. Press the zipper unit inside the bag. Pin.

- Topstitch 1/8″ from the folded top edge of the bag. Sew Slowly over side seams where fabrics are thicker.

- Tie an additional 3″ length of ribbon to the zipper pull.

- The first nesting bag is finished!

Watch Travel Gear Made Easy on Sewing With Nancy online.
To watch Sewing With Nancy on your iPad, iPod Touch, or iPhone, download the app.

For a Chance to win a copy of Mary Mulari’s book, Travel Gear Made Easy, please leave a comment below sharing your favorite project from the TV series, Travel Gear Made Easy.

Don’t forget to submit your Pillow project for the 2016 Pillow Sewing Challenge! The deadline to enter is March 20, 2016. Click here to see how to enter. Make sure you are subscribed to my enews mailing list so you won’t miss a thing. Sign up here.
Bye for now,
![]()


Barbara
Can’t wait to try making some of these. Such cute bags!
Sherrie P
I like the fold up tote idea. I always forget to bring my reusable grocery bags into the store with me so I will be making one to keep in my purse.
Margaret LaVenia
Like seeing updated travel items. I have Mary’s first book on Travel Gear and have used it a lot. Like the new colors and finishes on bags!
Lisa Garrett
I love these bags! Can’t wait to make some!
Enid
Travel time is coming up. Need to make some bags for cosmetics and medicine.
Sue Dodson
I have made some of your travel bags from one of your books for a gift for my sister’s birthday. She loved them. Thanks for this pattern and instructions and video. I look forward to making these for gifts for family and friends.
Blessings!!!
Sue
Sheila
I really like the travel trio bags as these would make great gifts and can be personalized for each by the fabric selection and labels.
Cecelia
Love these bags – hoping I can get some made for gifts and myself.
marcia mcnamara
Love the drawstring bag!
KayZee
The travel trio bag set is my favorite, especially that zipper technique. Thanks for sharing!
Pat
My favorite project is the small tote. It would be wonderful to carry my electronic items and their cords. (What good is your cell phone if you forget to take your charger?) Wonderful zipper tips for the bags as well. Makes the dreaded zipper a breeze. Thanks so much.
Diane C
I like how the fit inside each other for storage
Brenda
I love the travel trio bag set!
Connie Taylor
Exactly what I have been looking for. Like you were reading my mind!
Cyndi
The small tote is great and my travel scale would fit nicely in it!! I can’t wait to make one!
Thank you for the giveaway!
Jane Weier
Thanks for the great idea for travel…I was just thinking I needed a new bag for cosmetics and the zipper looks so quick and easy. Love it.
Sharon
I have always loved this book, but I’ve never owned it. I made my own version of the travel blanket using Mary’s as my guide, and the young girl I gave it to loved it. If I won this wonderful book, I’d make every single thing in there! You simply cannot have enough little zipper bags!
Jackie
I made the three travel bag sets for each of my young nieces so they could travel in style when they come to visit. They really enjoy them. Now my sister wants a set. They make a great gift.
Karen payton
Mary’s jewelry pouch is so cute! The whole set would be fun to sew and give as gifts!
Mary B
I’m going on a cruise next winter, lots of great ideas to use. Think I like the fold away tote, great way to bring home those extra little goodies you collect while traveling! Great ideas!
Bonnie
So many wonderful projects! My favorites are the nesting bags and the fold up tote. Thanks for the great giveaway.
Kim H
Love love love the trio of bags! A new favorite for gifting!!!
Patty Sack
I really like the travel trio set and can think of a lot of people who would enjoy getting these as a gift!
Margaret (Peggy) C
Thank you once again for a project so easy to follow step by step, that means a great deal to me as I am a show me how please. I can do it then!
Arlene
Have been wanting to do these bags for a long time – the book would be a great addition to the email instructions!
Sherry Bartlett
The nesting travel bags are wonderful! I want to make them for gifts, but I also want a set for myself. Would love to win the book!
Sharon
I love the nesting bags – not just for travel.
Shaela
I’m looking at the nesting bags as perfect gifts
Louise Johnson
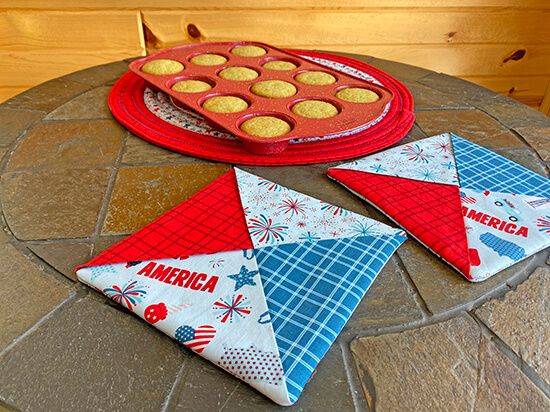
I made the name/identifier tie-on from the original time you presented this episode. I love it! My pretty calling card shows, but my info does not. Also it is really easy to see which piece of luggage is mine on the carousel at the airport. I made two of the travel trays from leftover quilted fabric from my luggage saddlebag. It was a little more work to finish the edges but fun to have the matching items. My husband really misses his if we forget them so I store them inside our packing cubes. I think I will have to make more of these simple projects for our future travels. As usual Mary gives us simple-to-sew but fun and useful projects. Thank you!
Joyce
Would love to make the nesting bags. A woman never has too many bags
Marilyn
The graduated sizes of travel bags are terrific gifts for anyone, any age! Would like to have the book for more projects!
Jan Hobbs
Excellent instructions and wonderful pictures! You make it look so easy and will definitely keep me busy. What a wonderful way to use some of my stash!
Tammy Kazmierczak
I love the nesting bags. I can’t wait to try my hand at the recessed zipper. I’ve been wondering how that was done.
Lorij
I like these bags. One for meds, one for cosmetics and one for personal items. Prefect for traveling and easy to locate when in a hurry if made out of pretty fabrics. It would be nice to win the book.
Mary Ellen
what great ideas. These would make perfect graduation gifts or retirement gifts for those who plan to travel. Am anxious to make the first one for my own travels. 🙂
Linda Morales
I would love to sew these items and these would make great gifts. I identify my luggage with masking tape around the handle and needs to be changed at times.
June
I love how they stack for storage!
Ell
The 8 x 10 travel bag size is so versatile. It’s the best.
Lillian K
I like the zippered travel bags. The zipper insertion appears to be simple.
Camille
I like the organizer tray. What a good way to keep small items organized on a hotel dresser! I learned something very important watching to the travel gear demos. I have an abandoned laminated fabric project because I did not know about Teflon non-stick and roller presser feet. With this knowledge, I can finally tackle finishing it.
Lynn
I loved the refresher on sewing zippers with Nancy and Mary! Why do I still shy away from this? My favorite piece is the round jewelry holder and making the inside with mesh is great so you can see what’s in each pocket!
Elaine
Since I am recently retired, I have started traveling more for pleasure. I can’t wait to make the zippered bags…or maybe first the folding tote so I can always be ready when I drop by the store…or maybe the tray, for when I’m preparing to leave (and won’t forget something) as well as corralling everything once I get there. Well, same wonderful problem as always: which project is FIRST? Thanks Nancy and Mary!
Kimberly Hubbard
Unfortunately I do not travel much. But I am a hospice nurse and travel to patient homes and these nesting bags would be perfect for carrying wound supplies and other tools of the trade. Great project! I love it!
Tina
I really like the zipper bags. So easy and quick to make. Thanks
Diann Weier
I have made lots of quilts from your programs including the fabric blackboard from years ago.
Maria Hart
I love the three zippered nesting bags! You can never have enough cute bags!
I plan on making my 20 something a set in fishing style fabric.
Carol
Who doesn’t love to travel? These bags make terrific gifts for everybody and that includes me!
Dawne
Love this tutorial! Trying the nesting bags now. However, you don’t mention when to sew on the second 2×3 piece onto the zipper. I am assuming you do before you sew the 3″ strips onto the zipper. Here’s hoping.
Nancy Zieman
Good catch! You do only need one square at the end of the zipper. You will need two 3″ rectangles on the right and left sides of the zipper. I’ll make that change right now. Thanks for the heads up; you are on the right track.