

Stitch it Sisters Tunic Pattern Fitting Tutorial the Nancy Zieman Way – McCall’s M8022
NEW! Watch Stitch it! Sisters Program 113: Tunic Pattern Fitting – The Nancy Zieman Way!
Watch the NEW! Stitch it! Sisters Program 113, Tunic Pattern Fitting – The Nancy Zieman Way with hosts Deanna Springer and Dana Casey. In this video, the Stitch it! Sisters share Nancy Zieman’s tried and true pivot and slide pattern fitting techniques for fitting our NEW! McCall’s Tunic & Dress Pattern, M8022.

 Then, head over to shopnzp.com and purchase our NEW! Pattern Fitting – The Nancy Zieman Way Bundle Box curated by the Stitch it! Sisters! Each NEW! Pattern Fitting – The Nancy Zieman Way Bundle Box includes Nancy’s Confident Sewing Collection Book featuring Nancy’s Pattern Fitting Techniques for sewing a perfect fit for jackets, skirts, and pants, along with a roll of Pattern Making Paper. Quantities are limited.

SHOP our NEW! Patterns and Exclusive Bundle Boxes at shopnzp.com
NEW! Watch Stitch it! Sisters Program 113: Tunic Pattern Fitting – The Nancy Zieman Way!
Watch the NEW! Stitch it! Sisters Program 113, Tunic Pattern Fitting – The Nancy Zieman Way. Learn Nancy Zieman’s tried and true pivot and slide pattern fitting techniques. Nancy’s techniques and expert advice give you the confidence and know-how to create perfectly fitting garments, every time, even for beginners!
Pattern Fitting Tutorial for McCall’s Tunic & Dress Pattern M8022

- Use Nancy’s Right•Size Measurement Fitting Chart to determine your pattern size to cut out.

- Find your Right•Size Front Width Measurement by measuring straight across the front chest, between the creases in your skin–where your arm meets your body.

- Use Nancy’s Personal Fitting Chart to record your body measurements and plan your pattern alterations.


- Take a small amount of time and follow Nancy’s step-by-step body measuring and fitting techniques for a pattern that is “fit to be tried.”

- In our NEW! Stitch it! Sisters Program 113, Tunic Pattern Fitting – The Nancy Zieman Way Video, we share Nancy’s tried and true pivot and slide pattern fitting techniques for fitting our NEW! McCall’s Tunic & Dress Pattern, M8022.

- Our NEW! McCall’s Tunic & Dress Pattern, M8022 features princess seams–for a flattering fit for all sizes, along with an optional hidden front pocket between the side front seams! Because our NEW! McCall’s Tunic & Dress Pattern, M8022 features princess seams–you’ll divide your needed increases (above) by eight, as we’ll have eight seams to when we’re later sewing our princess-style tunic.
- When the pocket pattern piece is stacked onto the center front pattern piece–you’ll see this pocket is located perfectly between the side front seams!

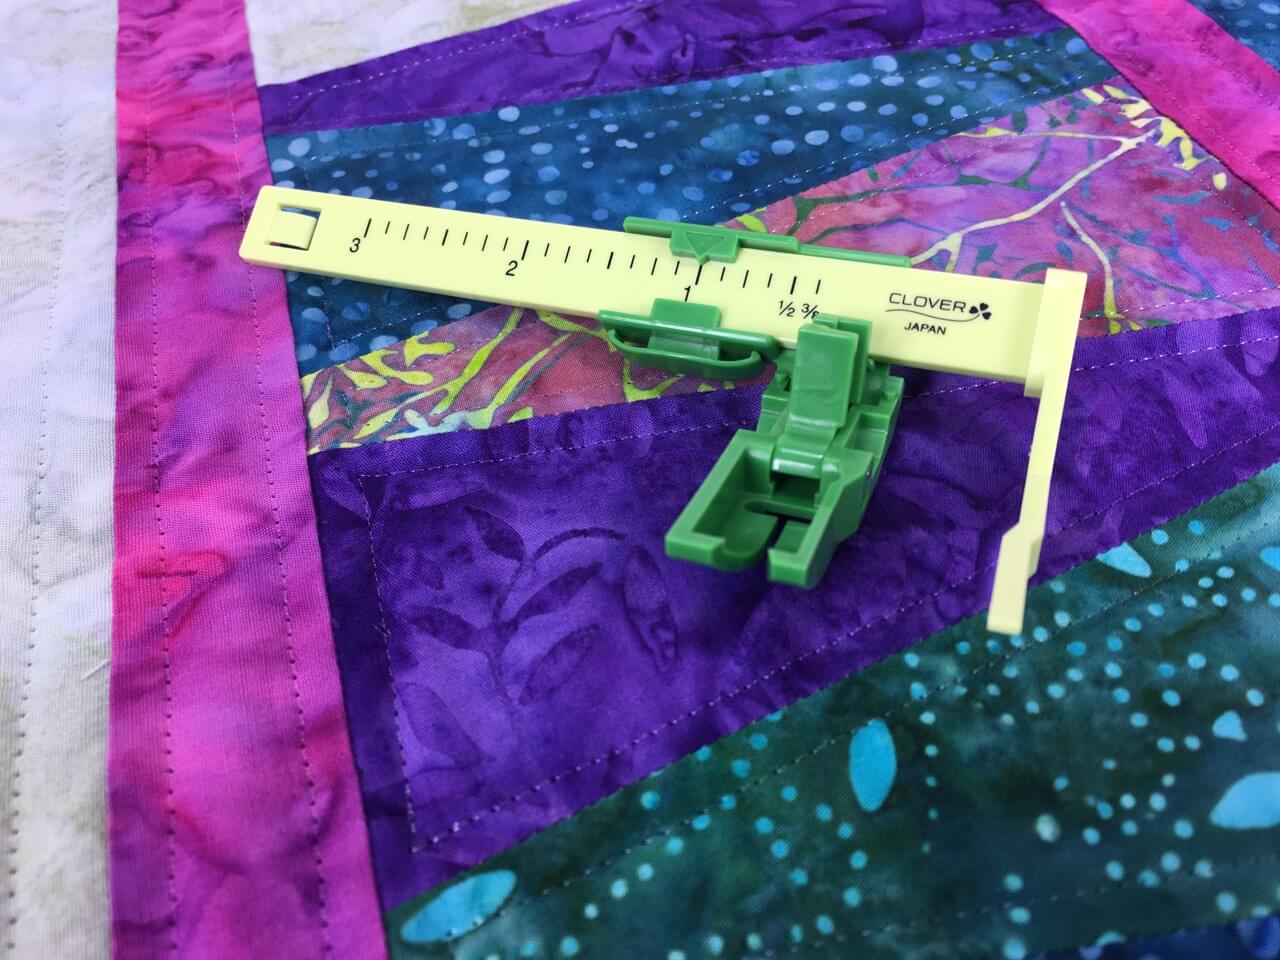
- In our NEW! Stitch it! Sisters Program 113, Tunic Pattern Fitting – The Nancy Zieman Way Video, we show step-by-step how to increase the bust line, waistline and hip line with Nancy’s easy pivot and slide pattern fitting techniques. Using Pattern Making Paper trace original center front pattern piece with a black marker. Using Clover’s 5-in-1 Sliding Gauge, measure and mark desired pattern increase amounts with a red marker.
 Before beginning the pattern fitting process, press Pellon’s Easy-Knit Interfacing to the back of each pattern piece, for ease in handling–plus durability! Be sure to press with an Eze-View Press Cloth and no steam.

 Place a pin at the stitching line where the shoulder and armhole intersect. “Pivot” the pattern to the desired bust line increase amount, and trace the outline of the original pattern edge.
- Keeping the pattern pivoted, move the pin to the stitching line where the armhole and side front seam intersect, pivot the pattern to meet the desired waistline increase, and trace the outline of the original pattern edge.
- Keeping the pattern pivoted, move the pin to the stitching line at the waistline, pivot the pattern to meet the desired hip line increase, and trace the outline of the original pattern edge.

- Keeping the pattern pivoted, move the pin to the stitching line at the hip line, pivot the pattern to meet the hem, and trace the outline of the original pattern edge to the lower hem.
- Repeat pivoting steps on the pattern side front, center back, and side back pattern pieces.
- Optional: Repeat pivoting steps on the sleeve pattern, if needed.

The pattern is increased in the bust line, waistline, and hip line–all while maintaining the original seams! The original cowl and sleeve pattern pieces will stitch together with the altered Right•Size pattern pieces!

- Prepare the center pocket pattern piece: Using Sewer’s Fix It Tape, tape a rectangle of Pattern Making Paper to the pocket pattern piece.

- Stack the pocket pattern onto the altered center front pattern piece, matching circles, and trace the Right•Size red marked lines onto the Pattern Making Paper of the pocket pattern piece.

- Transfer circle placement markings onto the Pattern Making Paper of the pocket pattern piece.

- All “Right•Size pattern marked lines”–in red–are now the new pattern cutting lines. Using Sewer’s Fix It Tape, tape original pattern pieces to Right•Size pattern pieces, and cut out pattern and fabric.

Practice Nancy’s tried and true pivot and slide pattern fitting techniques using Nancy’s FREE! Mini-Pattern Pieces. Download and print Nancy’s Mini-Pattern Pieces, today!

Then, head over to shopnzp.com and purchase our NEW! Pattern Fitting – The Nancy Zieman Way Bundle Box curated by the Stitch it! Sisters! Each NEW! Pattern Fitting – The Nancy Zieman Way Bundle Box includes Nancy’s Confident Sewing Collection Book featuring Nancy’s Pattern Fitting Techniques for sewing a perfect fit for jackets, skirts, and pants, along with a roll of Pattern Making Paper. Quantities are limited.
NEW! Pattern Fitting – The Nancy Zieman Way Tools & Supplies:
- NEW! Pattern Fitting – The Nancy Zieman Way Bundle Box
- NEW! Sew A Tunic Bundle Box
- NEW! McCalls’ M8022 Tunic/Dress Pattern by Team NZP
- Pattern Making Paper
- Sewer’s Fix It Tape
- Clover’s I Sew For Fun Spring Tape Measure
- Clover’s 5-in-1 Sliding Gauge
- Clover’s I Sew For Fun Heart-Shaped Pins
- Clover’s Pin ‘n Stow Magnetic Wrist Pin Cushion
- Pellon’s Easy-Knit Interfacing, 5 yd. Pack
- Eze-View Press Cloth
- Red and Black Sharpie Markers
- Iron
Shop Pattern Fitting Supplies & Bundle Boxes at shopnzp.com!

Shop Elastic, Cotton Webbing, Zippers & More at shopnzp.com

Shop Clover Tools & Sewing Supplies at shopnzp.com!

Shop Pellon Interfacing & Supplies at shopnzp.com!

Shop Schmetz Sewing Machine Needles at shopnzp.com!


For a chance to be the random winner of a Stitch it! Sisters 5″ Fabric Short Stack with exclusive S!S button & sticker, please leave a comment below.
Nancy Zieman Productions will give away one Stitch it! Sisters 5″ Fabric Short Stack to one US resident in the 48 contiguous states. Winner must reply within 30 days to the official giveaway announcement email message – sent from Nancy Zieman Productions. Email Team NZP at [email protected].

The randomly selected winner of a set of eight Landscape Quilt Note Cards Set by Nancy Zieman, from the April 7 Blog Post, Nancy Zieman Original Giclée Canvas Landscape Art Print: Out on a Limb, is Connie Jennings.

Her comment is: They are all lovely, but there’s something about the simplicity of Moon Lit Birches that attracts me. I have her Landscape books and DVD’s and plan to get started on one of my own soon..
Happy Fitting!
Team Nancy Zieman
Nancy Zieman Productions. LLC.

Stitch it! Sisters is a production of NZ Productions LLC. Content in this feed is © copyright 2020 by Nancy Zieman Productions, LLC and may not be republished without written permission. You’re welcome to forward the email to a friend or colleague but it’s not okay to add the RSS feed automatically as content on a blog or other website. The FTC requires us to tell you that Nancy Zieman Productions, LLC has provided products by other companies in the course of doing business. The FTC requires us to advise you to take this information into consideration when reading this posting.


Nancy
Lovely colors in this short stack. Thanks
Cynthia d.
Looking good. I would like to add this to my San Fransisco design.
Bonnye
I really like the tunic. Flattering on all women.
Barb K
Makes me think of my 4-H sewing days!
Dixie
I like the tunic. Would be fun to make.
Carolyn T
Great lesson on getting the rght fit! Thanks for the practice pieces.
Susan Du
Thank you Stitch It! Sisters for continuing to share Nancy’s great tips with the video.
Susan
This tunic/dress pattern is quite versatile and the instructions are so helpful to get that just right fit.
Jeanie K.
So do you only make the pivot and slide on the single side of the pattern or does it need to be made on both sides of the pattern? Because you divided the increase by 4, I assumed you’d be making the addition on each side (right and left of pattern). On the princess side, because there were no hard corners to easily pivot, I was wondering how you would make that increase. Thanks for displaying this method. So much easier to understand.
Nancy Zieman Productions, LLC
Hi Jeanie,
“Pivot” each pattern piece to desired increases, and trace the outline of the original pattern edge–on the “underarm” side of each pattern piece. The center front seam/fold should not be increased. For patterns with princess seams–the pattern piece edges facing the underarm will be increased, and the pattern piece edges facing body front center/back center will not be increased. So, yes, you’ll only make the pivot increases on the single side of each pattern piece. The increase is divided by four, as there will be four cut edges when pattern is used to cut out fabric. Please feel free to email the NZP Team with questions, and please include your phone number. We’re glad to help! [email protected]