
Quilting Magic with Your Embroidery Machine
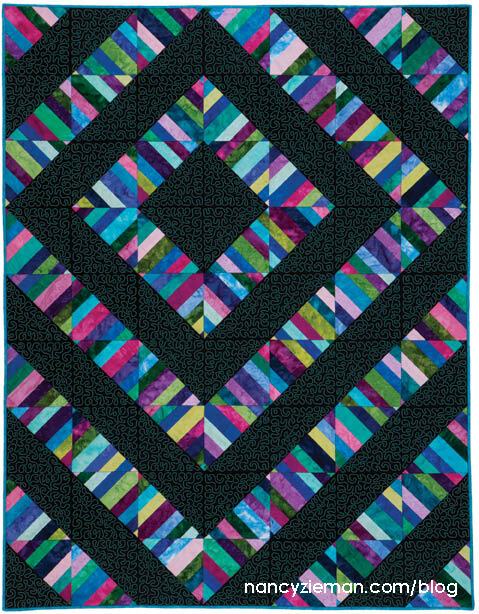
Whether you’re a first time quilter or a seasoned veteran, this method of block piecing and quilting creates professional looking results, every time. The secret is using your embroidery machine. The blocks are skillfully pieced and the quilt is quilted with the precision of a long-arm, all in the hoop. This vibrant Diamond Spectrum Quilt pattern features several techniques—from piecing to layering, and on to final quilting. Let me show you this fast and fun method of quilting with your machine.

Supplies
- Stress-Free Machine Embroidery: Diamond Spectrum Quilt
- Embroidery Software for printing templates, such as Amazing Designs® Exit Express™
- Fusible Mesh Cut-Away Stabilizer
- 2-1/2″ fabric strip pack (40 strips per pack) These precut packs are commonly called Jelly Rolls.
- 2-1/4 yard background fabric (We used black.)
- Coordinating all-purpose thread, such as Madeira Aerofil
- 50 Weight Quilting Thread
Make a Block
- Use the embroidery software program to print the template for, in this case, the 8″ x 8″ block.
- Notice the different sections of the block and the numbers within. These numbers indicate the piecing sequence.
- Cut the fabric strips to the following lengths, per block. A project sheet is included with the product for complete quilt requirements.
-One piece: 2-1/2″ x 12-1/2″
-Two pieces: 2-1/2″ x 11-1/2″
-Two pieces: 2-1/2″ x 8-1/2″
-Two pieces: 2-1/2″x 6″
-Two pieces: 2-1/2″ x 3-1/2″
-One contrast/background square: 9-1/4″ x 9-1/4″


- Hoop a Fusible Mesh Cut-Away Stabilizer, fusible side up.
- Set up the sewing machine with the embroidery unit and appropriate foot.
- Import and select the embroidery design for the block.
- Select all-purpose poly or poly/cotton thread; wind the bobbin with the same thread as used in the needle. A slightly contrasting color works best. (Now this is different! Rayon thread is usually used for embroidery but we’re piecing quilt blocks!)
- Stitch the first thread color directly on the stabilizer.

- Pre-select fabric strip arrangements, keeping a mix of colors in light, medium, and dark values.
- Start with the center strip, section one. Place the 12-1/2″ fabric strip over that section making sure the fabric covers the stitching lines and extends equally in all directions.
- Fuse the fabric strip to the stabilizer with a mini iron.

- Stitch the thread Color 2, which bastes down fabric #1.
- Align the 11-1/2″ strips along the diagonal fabric edge matching right sides together. Make certain fabric is extended equally beyond the outline on the stabilizer at opposite corners.

- Embroider thread Color 3 to stitch the section to the block.
- Fold the second fabric strip over the stabilizer.
- Start pressing from the folded edge, working to the opposite corner to eliminate wrinkles. “Pre-pressing” with your fingertips is ideal—you can feel any wrinkles.
- Press and fuse the fabric strip to the stabilizer.
- Embroider thread Color 4 to baste the pressed section to stabilizer.
- Trim away excess fabric along the previously stitched basting line.

- Align the 8-1/2″ strips along the diagonal fabric edge matching right sides together. Make certain fabric is extended equally beyond the outline on the stabilizer at opposite corners.

- Embroider thread Color 5 to stitch the section to the block.
- Fold the second fabric strip over the stabilizer.
- Start pressing from the folded edge, working to the opposite corner to eliminate wrinkles. “Pre-pressing” with your fingertips is ideal—you can feel any wrinkles.

- Press and fuse the fabric strip to the stabilizer.
- Embroider thread Color 6 to baste the pressed section to stabilizer.
- Trim away excess fabric along the previously stitched basting line.

- Repeat these steps to complete the remaining sections with the remaining cut strips.

- Before stitching Color 19, tape the seam edges with Sewer’s Fix-It Tape. This prevents the embroidery foot from catching on the fabric folds as your embroider the outer block perimeter.
- Place the tape 1/8″–1/4″ away from the stitched basting lines.
- Trim the fabric ends approximately 1/2″ from the perimeter stitching lines.

- Position the contrast/background square over the pieced block in the hoop.
- Align the squares’ edges to extend equally beyond the Color 19 stitching line. Optional: Lightly apply tape to the corners.
- Embroider Color 20, which sews two perfectly diagonal rows of stitches.

- Remove the block.
- Turn the block over to trim the seam allowances past the Color 19 stitching line to 1/4″.
- Cut between the diagonal stitched lines.

- Each embroidered block produces a set of two finished Diamond Spectrum blocks.
 Design a Quilt Top

- Once the blocks are created, arrange this high-contrast block in any of these traditional settings:
Amish Rainbows and Shadows: Place blocks with contrast fabric in the upper left corners for each block. Spectrum in Diagonal: Place blocks with contrast fabric in the lower right corner first, then upper left corner; repeat across the row. Alternate the block arrangement in the remaining rows.
 Rainbow Spectrum on Point: Place four blocks with rainbow pieced sections meeting.
 Machine Embroider to Quilt

- Choose a quilting embroidery design. The Diamond Spectrum Quilt Collectionincludes the featured stippling pattern, specially sized for each size block.
- Print a template using an embroidery software program such as Amazing Designs® Exit Express™.
- Trim excess paper.
- Position the template over the quilt and tape in the desired location.
- Align the quilting embroidery design, hoop quilt, and quilt. Details covering hooping options and specific steps can be found in the complete directions.

- Remove the paper template, once the hoop and quilt are aligned.
- Change thread and bobbin to 50 weight machine quilting thread, if desired.
- Embroider.

- Add embroidered quilting to all desired areas of the quilt repeating the previous steps.


Watch Stress Free Quilting with Machine Embroidery Part Two on Sewing With Nancy online.
To watch Sewing With Nancy on your iPad, iPod Touch, or iPhone, download the app.
 Leave us a comment sharing the most stressful step in the quilting process to be entered to win a CD of Stress-Free Machine Embroidery: Diamond Spectrum Quilt.
 The random winner of a 6-in-1 Stick ‘n Stitch Guide from Clover is Ruth Meek. She said: I would love to own this handy gadget!! I’m getting back into sewing, & this would be invaluable for perfect seam allowances.


Don’t forget to submit your table runner in my Fall Table Runner Challenge! The deadline to enter is MONDAY, September 14. Click here to see how to enter. Make sure you are subscribed to my enews mailing list so you won’t miss a thing. Sign up here.
Bye for now,
![]()


Cathy
Putting everything together. But your video’s are are very well done and it makes it a lot easier. Thank you for your time and your knowledge.
Lynn Scoville
The actual quilting is stressful for me. This cd would be a God send.
Nancy, glad you are doing better.
Linda Jerome
the most stress I have is trying to machine quilt the quilt and have it look good with no wrinkles.
Martha Morgan
I am still having a problem with assembly – trying to work with sash-ing and corner stones, matching blocks. It is hard and stressful for me.
Angelia Ulrich
Very interesting technique! Thank you.
Cindy Schultz
The most stressful part of the quilting process for me is free motion quilting. I love my embroidery machine and think it would be great to make and embroider the quilt. You have such great ideas. Thank you.
Alice
How wonderful is this technique! I always stress out about quilting my quilt. This looks like it might be the answer to stress-free quilting.
Cyndi
My problem is working with the quilted squares getting them straight and even! thank you for the give away!
Bernadette Webre
Th whole finishing process for me is a struggle – layering the quilt, pinning, basting, deciding on the quilting. I have trouble finishing.
Sheila
Quilting the quilt is definitely the most stressful part for me. This method certainly looks as if it would make the process a lot easier.
Andie Letourneau
The most stressful parts of quilting are deciding which colors and design to use, then deciding which quilting pattern to use to finish it up. I still have a quilt that I started 15 years ago that isn’t finished because it needs to be quilted.
Candice
As a complete novice when it comes to quilting, the entire process is intimidating. Just reading this post has given me inspiration, and confidence that I can do this!
Allen
Picking out the fabrics is the worst part for me. I second guess my choices all through the piecing process but after the quilts are all finished they normally exceed my expectations. All that worry for nothing!
Ilana
The actual quilting is the most stressful part for me.
Peggy V
The most stressful part for me is the free motion quilting this is the answer for me!!!
Mary Ellen
Fear of making a mistake is my biggest problem. After spending lots of money on the fabric and the time spent in creating and then sewing the pattern–I would hate to screw up the actual final step of sewing the quilting design.
Carol Dyl
By far for me it is trying to figure out HOW I want to quilt the top…. what design? hand or machine? free motion or stitch in ditch? Also free motion intimidates me!
Michael
The most stressful part of quilting is the stitching of the 3 layers. I find that mapping out the movement and making sure you can see where your going when on the machine is very tricking. If you make a wrong turn you have a lot of material to maneuver to get back on track.
Lori Morton
The most stressful part of quilting process has to be when ready to quilt it! Am just learning to do more than stitch in the ditch tho…want to learn to FMQ on my regular machine, and have only practiced on pieces that have been made into Hot Pads for my Kitchen! LOL
Thanks for chance to win this Give-a-way!! 🙂
Kelly Sasman
It is nerve racking trying to decide what pattern to quilt once I have my quilt all together. Even if I decide to stipple or free motion it is stressful deciding on the size or if I stipple the whole thing or just the blocks.
Wanda Rosenbarger
I love the piecing part, but intimidated by the quilting process. It looks so easy on videos, but I have not mastered the art of moving the project smoothly with even stitches. And, I know I can send it out to be quilted, but I really want to do it all myself.
Linda Beachler
I love to quilt, the process or picking fabrics, patterns, and sewing it together is so fun! However, when it comes to the quilting the top, I am beyond stressed. I have over 10 quilt tops ready for quilting. . .I have vowed to finish them before I start another one.
J Corso
As a beginning quilter, all of the steps seem daunting at first. As I’ve learned each step it takes the mystery out of the process and it becomes more understandable. As I have yet to put the backing on my first table runner and actually quilt it, these next two steps are the most stressful! The quilt as you go approach of the embroidered quilt seems to take a lot of the stress out of the whole process!
Lynn
Finding both the time and the space to do the quilting can be the hardest.
Renea
I love all parts of quilting except the process of picking the fabrics to use together in a quilt. Thanks for the great giveaway.
MarLane Dows
Free motion quilting is not as easy to do. I would be proud to show off a quilt made this way.
Marit Hoff
I think the most stressful part if the quilting process is figuring out how to quilt the whole thing. After being so careful with the piecing I don’t want to mess anything up. Your directions and CD sure would help!
Lorij
I think choosing the back may be the hardest part for me. I like the back to be as pretty as the front. Sometimes finding a fabric to match isn’t very easy.
Debra Reber
I love to piece!! But then the stress begins, when I have to baste the 3 layers together, figure out how to quilt it, & then quilt!!
Sue Knudsen
This looks like I could really do it! Thanks, Nancy!
Sue
I would love to try quilting with my embroidery machine. Sounds like fun and far less stressful.
Shirley Clark
Quilting would have to be the most stressful. I don’t have a machine that uses a stitch regulator and hand stippling is really hard so using the embroidery machine is my best option. Thanks for the tutorial!
Peggy S.
I am ready to quilt my granddaughter’s quilt and trying to decide how to quilt it. Never thought of using my embroidery machine. Thank you for the great ideas, now all if need is the CD to move me along. Thank you for sharing with us.
Kay
Free-motion quilting is the hardest part for me. Using my embroidery machine would be great!
Kim H
For me the most stressful step in the process of quilting is getting the quilt finished! I can get most everything done and then put the quilt down and leave it. I need to get quite a few tops quilted and finished.
Starla
What a treat for the eyes!
Bonnie
What a fascinating technique! The most stressful part of quilting for me is the actual quilting. I enjoy fabric selection and piecing, but I am always unsure about how to quilt the finished piece. Stress-Free Quilting With Machine Embroidery would be a great solution to my problem.
Vicki B.
I would love to be able to quilt on my embroidery machine.
Helen Satterfield
The most difficult part about quilting for me is relaxing. I do enjoy the process of Free Motion, but I don’t seem to be able to relax with it. Thank you so much for teaching your Diamond Quilting Method and your vast knowledge on the subject of quilting and sewing.
Gail
Every step of quilting is daunting to me! You make it look so easy!
Helen Jennings
My biggest problem is space and time. I don’t have much space to sew. I don’t have enough time to sew working full time and taking care of grandchildren. This should change soon though. This CD would be helpful with the space. Thanks
Debbie C
When each of my granddaughters turn 9 I supervise them making a quilt to enter in the state fair. So far, we are 2 for 2 with first place prizes and the 3rd enters in a few weeks. In the past, we have had to borrow a friend’s long arm and the girls are just barely tall enough. This software would let them do it all by themselves!
Cathy Van Daalwyk
I think the most stressful part of quilting is the finish what to do and were to do it. Sending it to a long arm quilter is expensive.
Michelle Hall
as a beginner, I think picking the fabrics to get the effect I want is hard. And then trying to do more than just quilt in the ditch is intimidating to me
Debe
Deciding on a quilting design, but the machine embroidery sure takes the stress out of doing perfect quilting once a design is chosen! Thanks for great blog.
Sandra Chavez
My most stressful step in quilting is piecing the top. I think I’m “Piecing Challenged” … what a wonderful technique, piecing in my embroidery machine would certainly alleviate that stress. Thank you for the giveaway opportunity.
Joyce L.
This seems like such a great idea and would put my new embroidery machine to good use! The fact that you can change the design by just configuring the blocks differently is a nice option to use the pattern over and over and still have a “different” quilt.
Cindy Cooke
I think the nmost stressful part is placement. Looks like this cd you’ve offered will be taking care of that, at least on this particular pattern. I love putting my two favorite hobbies together…quilting and machine embroidery! Thanks for the opportunity ot win!
Cindy Cooke
I think the nmost stressful part is placement. Looks like this cd you’ve offered will be taking care of that, at least on this particular pattern. I love putting my two favorite hobbies together…quilting and machine embroidery! Thanks for the opportunity to win!